Quantcast
Channel: Cocos Forums - Latest topics
Viewing all 17070 articles
Browse latest View live

iOS13 + tvOS13 error: MPMoviePlayerController is no longer available

$
0
0

@FelixFox wrote:

Apple no longer supports MPMoviePlayerController in iOS13 + tvOS13 causing the following error when running on xcode11:

*** Terminating app due to uncaught exception 'NSInvalidArgumentException', reason: 'MPMoviePlayerController is no longer available. Use AVPlayerViewController in AVKit.'

I believe the error is associted with the cocos2dx UIVideoPlayer classes refered in the wrapper files: UIVideoPlayer-iOS.mm, UIVideoPlayer-mac.mm and UIVideoPlayer-iOS.h.

I know that @minggo from cocos 2dx dev team is working on this issue: https://github.com/cocos2d/cocos2d-x/pull/20085

  1. Do you know when will a version fixing this bug will be released?
  2. (kind of stupid question) is it ok just to replace the UIVideoPlayer files (UIVideoPlayer-iOS.mm, UIVideoPlayer-mac.mm and UIVideoPlayer-iOS.h) instead of migrating the entire project?

Thanks

Posts: 1

Participants: 1

Read full topic


Mac OS Catalina - System labels

$
0
0

@kmaker wrote:

Hi,
I just updated to macOS Catalina and system labels (like the ones created with cocos2d::Label::createWithSystemFont) are not showing properly.

Following the code in Device-mac.mm, it looks like the bitmapData obtained from the NSBitmapImageRep has 16 bit depth rather than the 8 bit expected.

This is also happening with apps compiled on High Sierra (i.e., without recompiling them).
Can someone confirm this?

Posts: 1

Participants: 1

Read full topic

Tutorial: CocosCreator + Chrome Utility Plugin

$
0
0

@slackmoehrle wrote:

CocosCreator + Chrome Utility Plugin

Spector.js Introduction

Spector.js is a debugging tool for WebGL. It can help developers understand what happens in the WebGL context. It will display the internals of each frame, and tell what texture is rendering with each draw call.

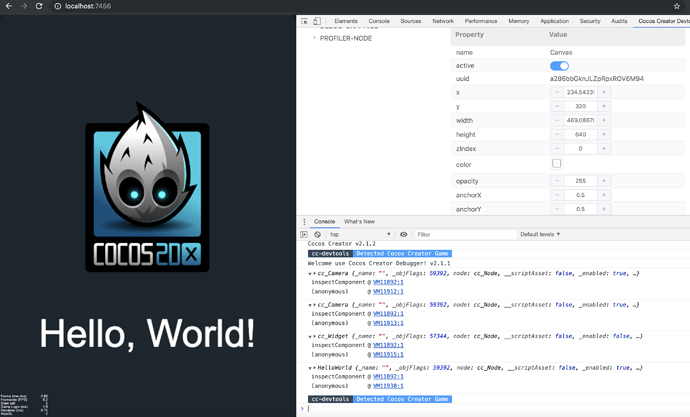
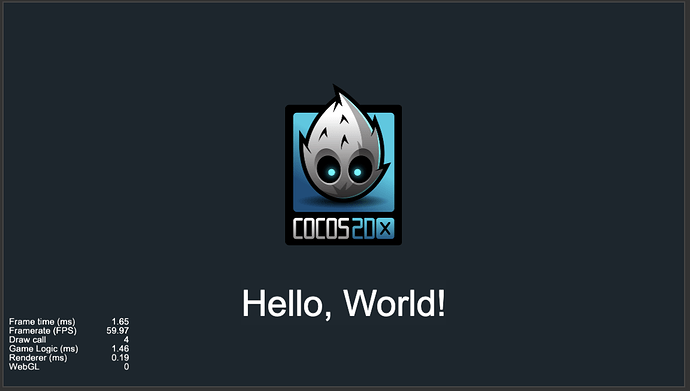
For example, we built a new Hello World project with Cocos Creator v2.1.2

When the project is previewed in Chrome, you can see that:

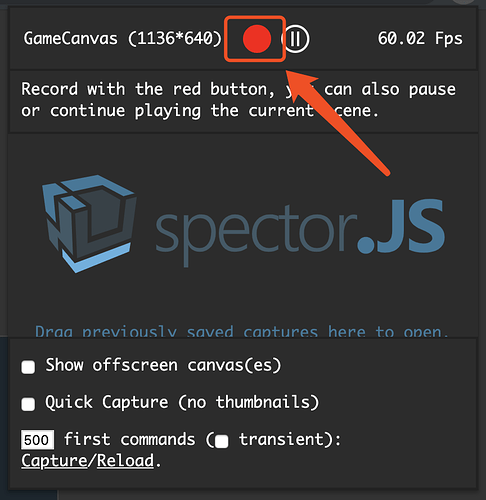
Next, we can click the button at the top right of Chrome to open Spector:

A green icon now shows we are using Spector:

Click the green button to pop up the interface

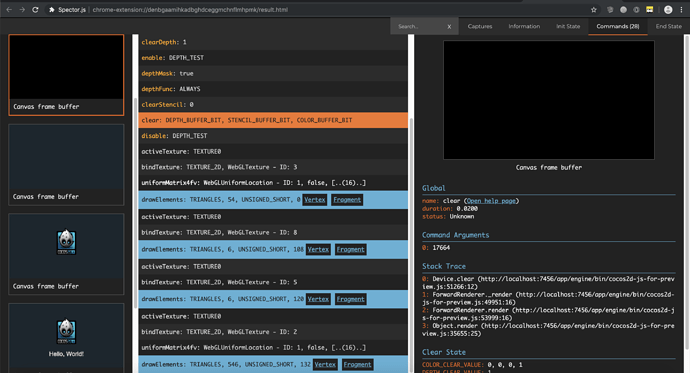
Now, we can see the WebGL information of the current frame of our project

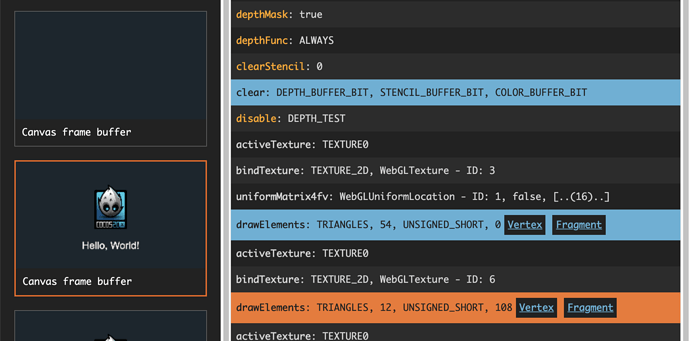
The left column is the display after each GL instruction invoked.

The middle column is each GL commands that we executed.

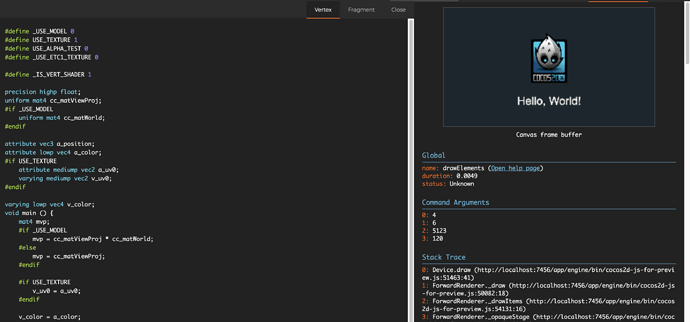
The right column details of each GL command.

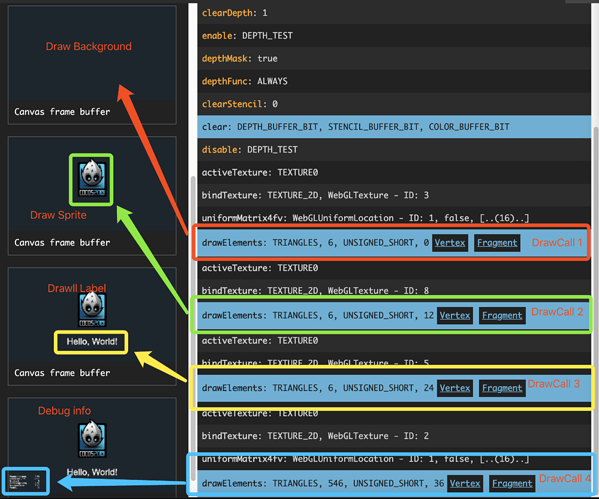
You can see what is drawn in each draw call.

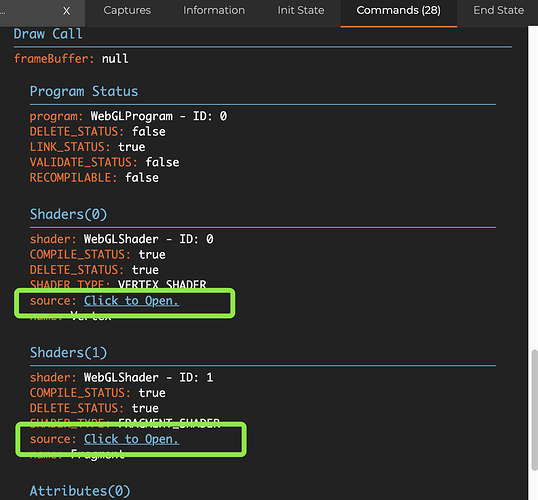
It is also possible to check out the details of shaders with each draw call by clicking the button as follows:

This is very useful!

How to use Spector with development

When we use the dynamicAtlas feature, we can check out the details of each draw call, and find out which render component has broken batching.

Knowing which render component breaks batching, we can follow the thread, and try to find why it breaks batching. Is it because of the difference in Materials (Shaders) or because of the difference between groups? Or other reasons?

For example, we changed the CacheMode of the Label component to BITMAP mode in the Hello World project.

Now, let’s take a look at the draw call:

The Label and Sprite are drawn in one draw call, then are batched.

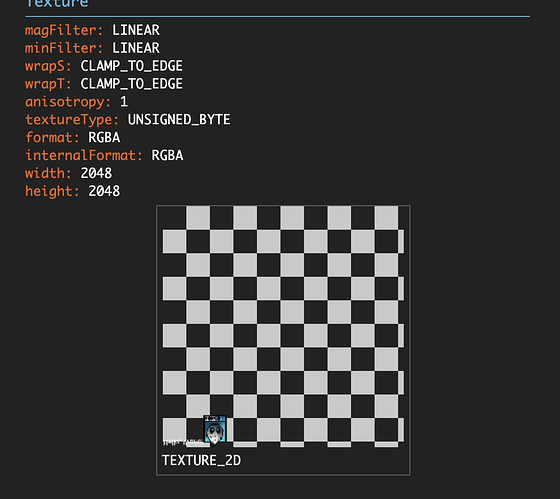
In the right column, the textures used by Label and Sprite were merged to a dynamic atlas, and now all are using the same texture.

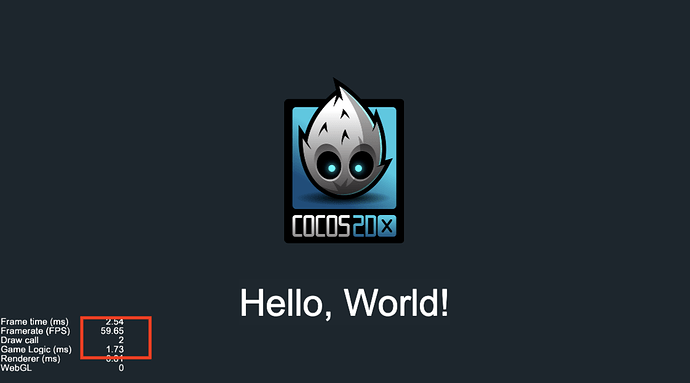
With this information, we can make further optimizations of draw call. First, focus on the background node. The texture being used is: singlecolor.png, and has a size is 2 x 2. The dynamic atlas can not batch it, because of the small size. Knowing this, we can change the size to 32 x 32, and now the texture can be batched.

From this, we can see the draw call will be optimized to 2. One is the debugger information, displayed in the bottom left, we don’t need to care about this call.

That is how we use Spector to help us optimize rendering and find problems.

WebGL Insight

WebGL Insight is also a debugging tool for WebGL, but it has fewer features and less convenient to use than Spector. It has some of the same features as Google Dev Tools, but is not as easy to use. If appropriate, you can download it and try.

Cocos Creator Devtool

Cocos Creator Devtool can help to check the information for a Node during previewing and can also change the properties of a Node during running. Debugging complex UI interfaces becomes much easier. However, a drawback is that properties of custom components cannot be modified, and currently this tool only supports components that are provided by the engine. It can also make some debugger code unnecessary and prints information of a Node in the console without pausing.

Cocos Creator Debugger

Cocos Creator Debugger is similar to the Cocos Creator Devtool mentioned above, however, it doesn’t support Cocos Creator 2.1.x, and hasn’t been updated for a long time. If appropriate, you can download it and try.

Posts: 2

Participants: 1

Read full topic

macOS 10.15 and iOS 13 bug fixes

$
0
0

@slackmoehrle wrote:

Hi Everyone,

Just FYI, some issues that occur on macOS 10.15 (Catalina) and iOS 13 have indeed been fixed in our GitHub repo.

  1. System font label rendering issue on macOS Catalina. Corresponding issue: https://github.com/cocos2d/cocos2d-x/issues/20076

  2. VideoPlayer error on iOS 13 as MPMoviePlayerController is removed, corresponding pull request is https://github.com/cocos2d/cocos2d-x/pull/20085

  3. WebView error on iOS 13 as UIWebView is removed, corresponding pull reuqest is https://github.com/cocos2d/cocos2d-x/pull/20098

Posts: 2

Participants: 1

Read full topic

Please fill out your profiles

$
0
0

@slackmoehrle wrote:

Hi Everyone,

What do we need?

We are now asking ALL users to fill out new fields, located in your Profile:


07

You can do it at this URL. substitute in your user id:

https://discuss.cocos2d-x.org/u/**your user id**/preferences/profile

Please fill this out within the next 2 week. If after 2 weeks this information isn’t complete we will silence posting until it is completed.

Why?

Cocos has been open-source since it’s inception. We believe in open-source and it lives in our core DNA. However, this poses a problem. We don’t know who our users are and how they use our products unless they post to our Game/Demo Showcase. We respectfully ask you to complete these questions to help us learn more about our user base.

Thank you! We appreciate the help.

Posts: 2

Participants: 1

Read full topic

Tutorial: Creating a third-person game in Cocos Creator 2.1.2

$
0
0

@slackmoehrle wrote:

Creating a third-person game in Cocos Creator 2.1.2

This article will demonstrate how to use a number of cameras to build a simple third-person game. Review the following documentation before starting this tutorial:

What is covered in this tutorial?

This tutorial will implement a simple third-person game that requires a focused target, a camera that rotates around the target, and some UI elements that demonstrate interactions between everything. Example:

  1. Free viewing of 3D characters.
  2. 3D characters in the UI.
  3. UI interface.
  4. Move the control and operate with the buttons [A] [W] [S] [D].
  5. Rotate the lens, hold down the left mouse button and drag to zoom the view.

Structure of the world node tree

The structure of the node tree used in this tutorial will be:

  1. Camera3D camera for free rotation around the target (girl_3d).
  2. CameraBody is used to render the 3D target (girl_on_ui) to the 2D interface.
  3. Main Camera Camera for 2D interface rendering.
  4. View3D A 2D Sprite for receiving 3D models rendered by CameraBody.
  5. girl_3d a 3D character model.
  6. girl_on_ui a 3D character model.
  7. touch is used to receive mouse events to control the camera’s third-person perspective.

Camera grouping

Using grouping will mark which camera the Scene object should be rendered by.

  1. default group is used for 3D model rendering.
  2. ui group is used for interface rendering.
  3. head group is used to render the 3D model into a 2D sprite.

2D camera

New Scene objects will auto-create a 2D camera by default. Remember to manually adjust to ui group.

  1. Adjust the value of Group to ui group.
  2. Adjust the culling mask and check the ui to indicate that the camera will only affect the node objects of the ui group.
  3. Adjust the clear flag. Since multiple cameras are rendered at the same time, the operation of clear color can only be processed on one camera, which will not cause a certain camera rendering not to be displayed.

3D camera

The default configuration of a new camera is to work in a 2D state. It is necessary to select the 3D button to make the camera work in a 3D state.

  1. Activate the 3D toggle button.
  2. Adjust the value of Group to default.
  3. Adjust the culling mask and check the default to indicate that the camera will only affect the node objects of the default group.
  4. Adjust the clear flag. Since multiple cameras are rendered at the same time, the operation of clear color can only be processed on one camera, which will not cause a certain camera rendering not to be displayed.
  5. use perspective mode, clear ortho mask.

3D model rendering to a 2D sprite

The default configuration of a new camera is to work in a 2D state. It is necessary to select the 3D button to make the camera work in a 3D state.

  1. Activate the 3D toggle button.
  2. Adjust the value of Group to head.
  3. Adjust the culling mask and check the head to indicate that the camera will only affect the node objects of the head group.
  4. Adjust the clear flag and check the clear color flag as we will only display the model rendering results.
  5. use perspective mode, clear ortho mask.

To render a 3D model to the 2D interface, we use the cc.RenderTexture component to save the camera rendering results to the texture. Example:

const { ccclass, property, executeInEditMode } = cc._decorator;

@ccclass
@executeInEditMode
export default class GCCameraRT extends cc.Component {

    @property(cc.Camera)
    cam3D: cc.Camera = null;

    @property(cc.Node)
    world3D: cc.Node = null; // used to place 3D nodes

    @property(cc.Sprite)
    view3D: cc.Sprite = null;

    // LIFE-CYCLE CALLBACKS:

    onLoad() {
        if (!this.cam3D)
            return;        

        let texture = new cc.RenderTexture();
        texture.initWithSize(cc.view.getFrameSize().width, 
                             cc.view.getFrameSize().height, 
                             cc.gfx.RB_FMT_D24S8);

        let spriteFrame = new cc.SpriteFrame();
        spriteFrame.setTexture(texture)

        this.view3D.spriteFrame = spriteFrame;
        this.cam3D.targetTexture = texture;
    }

    start() {

    }

    update(dt) {
        if (CC_EDITOR && this.cam3D) {
            this.cam3D.render(this.world3D);
        }
    }
}

Using a camera in 3D scenes

In this tutorial, the camera plays the role of an observer. The camera can rotate around the character model. When the player moves freely, the camera will follow in real-time.

In the game scene, we use the character model as the focus in the world. To implement this behavior we need to this about these concepts:

  1. Camera and character follow binding.
  2. Rotation control of the human lens.
  3. Mobile control of the character model.

3D camera rotation and position following

  1. First, set the angle of the camera
  2. Move the camera to the appropriate position according to the angle set by the camera and the distance between the camera and the person.
  3. The position of the camera and the character is updated in real-time, so we add the camera control code to the update function of the script.

Example:

update (dt) {
  if (!CC_EDITOR) {
    this.onMove();
  }

  // Set the camera orientation
  this.camera.node.eulerAngles = new cc.Vec3(this.degreeX, this.degreeY, 0);

  // Node position as the origin
  var local = new cc.Vec3(0, 0, 100);
  var newLocal = new cc.Vec3(0, 0, 0);  

  // The lens is far and near, here is a simple calculation in multiples
  local.mul(1, newLocal)
  local = newLocal.clone();

  var outMat = new cc.Mat4(
    1, 0, 0 ,0,
    0, 1, 0, 0,
    0, 0, 1, 0,
    0, 0, 0, 1
  );

  var mat1 = new cc.Mat4(
    1, 0, 0 ,0,
    0, 1, 0, 0,
    0, 0, 1, 0,
    0, 0, 0, 1
  );
  var quaOut =  new cc.Quat;
  quaOut.fromEuler(new cc.Vec3(this.degreeX, this.degreeY, 0))
  mat1.fromQuat(quaOut);

  // Rotate the direction
  local.transformMat4(mat1, newLocal);
  local = newLocal.clone();

  // Plus the node position (where 10 is assumed to be the height value of the model)
  var nodeLocal = new cc.Vec3(this.node.x, this.node.y + 10, this.node.z);
  local.add(nodeLocal, newLocal)
  local = newLocal.clone();

  this.camera.node.setPosition(local);
}

Movement control of character models

When the character moves, it is necessary to ensure that the moving direction is not affected by the free rotation of the camera, and the orientation of the character is consistent with the moving direction. Example:

onMove () {
  var nowDegree = this.degreeY;
  var find = false;
  this.keymask.forEach(()=>{
    find = true;
  })

  if (!find)
    return;

  if (this.keymask[cc.macro.KEY.w]) {
    nowDegree += 180;
    this.node.eulerAngles = new cc.Vec3(0, this.degreeY, 0);
  }
  else if (this.keymask[cc.macro.KEY.s]) {
    nowDegree += 0;
    this.node.eulerAngles = new cc.Vec3(0, this.degreeY - 180, 0);
  }
  else if (this.keymask[cc.macro.KEY.a]) {
    nowDegree += 270;
    this.node.eulerAngles = new cc.Vec3(0, nowDegree + 180, 0);
  }    
  else if (this.keymask[cc.macro.KEY.d]) {
    nowDegree += 90;
    this.node.eulerAngles = new cc.Vec3(0, nowDegree - 180, 0);
  }    

  var mat = new cc.Mat4(
    1, 0, 0 ,0,
    0, 1, 0, 0,
    0, 0, 1, 0,
    0, 0, 0, 1
  );

  var quaOut =  new cc.Quat;
  quaOut.fromEuler(new cc.Vec3(0, nowDegree, 0))
  mat.fromQuat(quaOut);   

  var newLocal = new cc.Vec3(); 
  var local = new cc.Vec3(0, 0, 1);
  local.transformMat4(mat, newLocal);
  this.node.z += newLocal.z;
  this.node.x += newLocal.x;        
}

The End

This tutorial mainly explains how to use the Camera in Cocos Creator. The code of this tutorial can be downloaded but the resources come from the internet, please do not use for commercial purposes.

Posts: 2

Participants: 1

Read full topic

--- Article Removed ---

$
0
0
***
***
*** RSSing Note: Article removed by member request. ***
***

Migrate 32bit apps to 64bit android cocos

$
0
0

@Breakout wrote:

Hi all. Once I bought 14 apps with cocos framework, but don’t know cocos technology and I have to migrate them to 64bit versions, according to google play requirements. I don’t know cocos version in this apps, guess it is 2.2.6 or earlier. All apps have a libplayer.so lib only for 32bit processors, I think this lib is created when project is builded by cocos script through command line, but I don’t know how to add 64bit support. Any help is welcome =) libplayer

Posts: 2

Participants: 2

Read full topic


Integrating Google Sheets Api

$
0
0

@Darren wrote:

Hihi,
I am new to Cocos Creator and JS altogether. (i’m much more familiar the cocos2d-x engine and coding in C++)

I am looking to build something for web / html5, so I am now trying out Cocos Creator. However, I can’t seem to find any information about integrating Google Sheets API. As the api comes with a number of client libraries (of different code languages) to choose from, what would be the best method?
https://developers.google.com/sheets/api/guides/libraries

I initially thought that it would be to use the JavaScript, but later realise that it is more for a web browser script, but may not be compatible with cocos creator, which is not a web-based framework?

And then, i saw this -> https://stackoverflow.com/questions/52570759/can-we-use-npm-packages-in-cocos-creator
which made me consider using Node.js, which is something i am totally new to.

So, what will be your recommendation? Is node.js the way to go?
Also, will this integration be only workable for web?
If I later decide to build for Android / iOS, will I have to separately use native integration?

Thanks!

Posts: 1

Participants: 1

Read full topic

Trackpad dragging is not working in Cocos Creator

$
0
0

@solodon wrote:

I’m not sure whether this is due to me using Cocos Creator 1.9.3 (apparently that is the last version where export to C++ still works right now) or upgrade to Mac OS Catalina, however, I’m hitting the issues described 2 years ago in Brief Issues and Impressions on Mac , in particular I’m unable to drag the scene in Cocos Creator using only track pad. I tried 2 and 3 finger gestures along with combinations of Command, Shift and Control buttons, but it keeps just zooming in and out of the scene. Anyone else unable to drag scene with track pad?

Posts: 1

Participants: 1

Read full topic

Setup firebase javascript SDK for facebook instant game

$
0
0

@NicolasVlhv wrote:

Hi everyone,

I’m struggling about setting up firebase javascript SDK for facebook instant game.

I have found tutorial about C++ , but since i’m developping a facebook instant game app, I’m using javascript.

I have followed firebase website’s tutorial about how to set up for a web app, but it doesn’t seems to be working.

If anyone can help me please !

Posts: 1

Participants: 1

Read full topic

Export layer to C++ from Cocos Creator

$
0
0

@solodon wrote:

In Cocos Studio I was able to save a layer (as opposed to the entire scene) into a file and then load that layer at run-time. Is something like that possible with Cocos Creator’s Lua/C++ support, @ricardo? I tried using File -> Import Project -> Import Cocos Studio Project (*.ccs) and I see that all my layer resources were simply ignored. I’m using Cocos Creator 1.9.3 along with the C++ export plugin.

Related questions closed without answer:

Posts: 1

Participants: 1

Read full topic

AudioEngine docs?

$
0
0

@digimikeh wrote:

hI !

i want to do a volume fade for my bgm when start and end a scene… however, there is no implementation for volume change on SimpleAudioEngine, so i need to switch to AudioEngine, but i could not find documentation how to use it, i was seeing API the only function i check to play sound is play2d, i tried to play my music and indeed works (i haven’t played with volume things yet) the problem is that seems i can´t to play two diferents audio at same time because i try i get this:

I/AudioEngine-Win32 (171): OpenAL was initialized successfully!
V/AudioCache (71): AudioCache() 0F1F3D7C, id=1
V/AudioCache (129): readDataTask begin, cache id=1
V/AudioPlayer (147): AudioPlayer::play2d, _alSource: 1, player id=1
V/AudioCache (294): readDataTask end, cache id=1
V/AudioCache (71): AudioCache() 0F1F44CC, id=2
V/AudioCache (129): readDataTask begin, cache id=2
D/AudioEngine-Win32 (280): AudioEngineImpl::_play2d, cache was destroyed or not ready!
V/AudioCache (294): readDataTask end, cache id=2
V/AudioPlayer (69): ~AudioPlayer() (0F19BDF8), id=2
V/AudioPlayer (83): AudioPlayer::destroy begin, id=2
V/AudioPlayer (128): Before alSourceStop
V/AudioPlayer (130): Before alSourcei
V/AudioPlayer (136): AudioPlayer::destroy end, id=2

Posts: 4

Participants: 2

Read full topic

Is Renderer::beginRenderPass() doing too much?

$
0
0

@trojanfoe wrote:

I noticed that when doing a frame capture on Xcode that there were repeated setting of the viewport, winding mode, scissor rect, etc. that would customarily be done once, at the very start of the render. This appears to come from Renderer::beginRenderPass():

void Renderer::beginRenderPass(RenderCommand* cmd)
{
     _commandBuffer->beginRenderPass(_renderPassDescriptor);
     _commandBuffer->setViewport(_viewport.x, _viewport.y, _viewport.w, _viewport.h);
     _commandBuffer->setCullMode(_cullMode);
     _commandBuffer->setWinding(_winding);
     _commandBuffer->setScissorRect(_scissorState.isEnabled, _scissorState.rect.x, _scissorState.rect.y, _scissorState.rect.width, _scissorState.rect.height);
     setRenderPipeline(cmd->getPipelineDescriptor(), _renderPassDescriptor);

    _commandBuffer->setStencilReferenceValue(_stencilRef);
}

Is it possible that we can remove these unnecessary calls from that method and put them somewhere else? I would imagine they are not required in OpenGL either?

What do people think?

Posts: 1

Participants: 1

Read full topic

cocos creator graphic node dashed line

$
0
0

@sushant wrote:

Hi guys, any one has any idea how can we create a dashed lines in cocoscreator, I am able to create a normal line but there is no function to create a dashed line.

Any help appreciated.

Posts: 2

Participants: 2

Read full topic


How to mask with cc.Graphics?

$
0
0

@ousaf wrote:

cc.Mask component have

type = IMAGE_STENCIL
sprite_frame = my_img.png

it works best with images but what if i want to create mask with cc.Graphics component as I not found any way to put cc.Graphics as a masking source.
Does there anyway to convert cc.Graphics to sprite frame and then use it in cc.Mask?

Posts: 1

Participants: 1

Read full topic

Problems with png resources in win32 project

$
0
0

@themronion wrote:

Hello there fellow developers. After six unsuccessful hours of trying to do something on my own i decided to reach out for help. Here is the problem. I was working on a project, everything was ok. Then, i don’t know why, i decided to rebuild my whole solution instead of just building it. And that’s when the problem occurred. All my png resources became ghosts. I mean, the compiler sees them, copies to the Resources folder in the Debug directory, but there is nothing but a black screen on the output. Now the most interesting fact: the mp3 resource playbacks. So, it has to be something with the image resources. Here is a piece of my code
‘’’ CocosDenshion::SimpleAudioEngine::getInstance()>preloadBackgroundMusic(“background_music.mp3”);
CocosDenshion::SimpleAudioEngine::getInstance()>playBackgroundMusic(“background_music.mp3”, true);

auto menuTitle = cocos2d::MenuItemImage::create(“smartrob.png”, “smartrob.png”);
auto menuPlay = MenuItemImage::create(“play.png”, “play.png”, CC_CALLBACK_1(MainMenu::GoToGameScene, this));
auto menu = Menu::create(menuTitle, menuPlay,NULL);
addChild(menu);
‘’’
P.S. I’ve tried rebuilding again, making a new project from draft (the standart one now also has no png resources displayed), upgrading Visual Studio, reinstalling Cocos2d. Nothing. Even restarting the PC.

Posts: 1

Participants: 1

Read full topic

how to do collision with a Dragon Bone

Collisions with DragonBones animations

$
0
0

@PEHM wrote:

Hi, i am using dragonbones to make skeletal animations. I’ve imported the swordsman data into my cocos proyect and now, i want to make that the attack animation generates collisions with another game character.

I have created a bounding box in dragonbones and I have created a phyisic polygon body with box2d, i linked the CCarmatureDisplay object as a userdata and i’ve got move my armature in my physics world applying forces and gravity. The problem is that i also need that the body be moved with the animacion so when the swordsman attack, its hits can generate a collision with another physic body.

I have used the body->SetTransform() metod but the bodies don’t collide, that’s because the body is frecuently updating its coordinates and when the collision occurs it tries to react according to but the position is inmediatly updated.

I need some idea, about how can i detect collisions from an skeletal animation made with dragonbones, i need it for a dynamic fighting game.
Thanks in advance!:grinning:.

Posts: 1

Participants: 1

Read full topic

Error in cocos creator 2.1.3

Viewing all 17070 articles
Browse latest View live


<script src="https://jsc.adskeeper.com/r/s/rssing.com.1596347.js" async> </script>