Quantcast
Channel: Cocos Forums - Latest topics
Viewing all 17083 articles
Browse latest View live

Unable to build Xcode project after importing sdkbox

$
0
0

Hi.
I created a new project with cocos2d-x v4 and imported admob with sdkbox.
The build was canceled when I tried to run it in Xcode.

I don’t know the solution because the error log doesn’t show anything in particular.
How can I build it?

The steps to reproduce this are detailed below.
I am using
cocos2d-x-4.0
Cocos Console 2.3
SDKBOX version 1.4.1.0
Python 2.7.15
macOS Catalina 10.15.5
Xcode Version 11.6 (11E708)

I installed cocos2d-x v4 and set it up, then created a project.

cocos new CocosTest5 -l cpp -p info.mygames888.cocostest5

I created xcode project.

cd CocosTest5/
mkdir ios-build
cd ios-build
cmake .. -GXcode -DCMAKE_SYSTEM_NAME=iOS

At this point, when I open xcode project and run, It built correctly and ran on my iphone.
However, when I imported sdkbox after this, it became impossible.

cd CocosTest5
sdkbox import admob

This is all I did.
admob should have been imported correctly, but I haven’t made any changes to the project yet.

I feel this problem is similar to the following topic.

But this topic is still unresolved.

Can anyone please tell me how to solve this problem.

Thank you.

1 post - 1 participant

Read full topic


How to show preview SpriteFrame of Atlas Texure

$
0
0

Hi everyone,

Do anyone know to show preview SpriteFrame of Atlas Texure in Asset Panel?
I’m using creator version 2.3.4 and Atlas Texure show spriteFrame in Asset panel like below:
image

Tks all,

2 posts - 1 participant

Read full topic

Customize IDE global variable?

$
0
0

Version: v2.4.0

I have a component that is executableInEdit, which is assigned to many nodes.
The component have a property named “activate” which is a boolean.
when in CC_EDITOR
if activate is true, it set the string of the target label to “TEST”
if activate is false, it set the string of the target label to “”

For each single node(component), I already implemented this on off function.
However I would like to use a global variable (eg. CC_CUSTOM_ACTIVATE) so that when in CC_EDITOR, it set activate by checking CC_CUSTOM_ACTIVATE (at least for the opened scene)

It there any way to customize the ide so I can add a global variable and toggle it somewhere? for example that variable can be toggled in project setting

1 post - 1 participant

Read full topic

on Trigger, this trigger node is disable

$
0
0

Hi!
I make a 3D game and want to know how to to disable coin when player enter in coin’s trigger ?

1 post - 1 participant

Read full topic

Considering to upgrade to 4.0 - is it worth it?

$
0
0

Hi there,
I am currently planning to upgrade from 3.17 to 4.0 for my iOS/Android game currently in development. The main reason behind it is metal support offered by 4.0.

However I am unsure because:

  • Does 4.0 support SDK box already? I am currently using this and like it a lot.
  • Is 4.0 stable?
  • How long will Apple accept games using openGL?

Could somebody help me with my decision?

All the best,
Rambazamba

1 post - 1 participant

Read full topic

Get collided Object

$
0
0

How to get the name/tag or component of the collided object in cocos creator 3D?

1 post - 1 participant

Read full topic

Custom context menu in cocos creator editor extension

$
0
0

Hi, I want to create a context menu to right click a folder in asset db, then appear item “Create animation from sprites”. That function to read all PNGs file in that folder then create an animation asset of them automatic. How can I do that?

1 post - 1 participant

Read full topic

How to serve static files

$
0
0

The game I am developing has a button for the player to click to download a PDF file. Anyway, I cannot find a way to include such PDF in the build folder. If I place it inside \build-templates\web-mobile, the file will be renamed to something like file.a2b56.pdf and I cannot refer to it like window.open('/file.pdf')

1 post - 1 participant

Read full topic


SDKBOX Ads v2.7.1.2 crash.

$
0
0

Hello,
I use Admob. It works fine but received crash report.

signal 11 (SIGSEGV), code 1 (SEGV_MAPERR)

v2.7.1.0 sdkboxads
v2.7.1.2 admob
dependencies { compile ‘com.google.android.gms:play-services-ads:18.3.0’ }

Cocos creator 2.2.2

Here’s the log.

*** *** *** *** *** *** *** *** *** *** *** *** *** *** *** ***
pid: 0, tid: 0 >>> - <<<

backtrace:
  #00  pc 0000000000cae66c  /data/app/-/lib/arm64/libcocos2djs.so
  #00  pc 00000000003ca954  /data/app/-/lib/arm64/libcocos2djs.so (SdkboxAdsListenerJS::onAdAction(std::__ndk1::basic_string<char, std::__ndk1::char_traits<char>, std::__ndk1::allocator<char> > const&, std::__ndk1::basic_string<char, std::__ndk1::char_traits<char>, std::__ndk1::allocator<char> > const&, sdkbox::AdActionType)+72)
  #00  pc 0000000000403a54  /data/app/-/lib/arm64/libcocos2djs.so (sdkbox::PluginSdkboxAdsNativeBridgeAdObserver::operator()(std::__ndk1::basic_string<char, std::__ndk1::char_traits<char>, std::__ndk1::allocator<char> > const&, _jobject*)+1488)
  #00  pc 00000000004727f8  /data/app/-/lib/arm64/libcocos2djs.so (Java_com_sdkbox_jnibridge_NativeBridge_emitNative+192)
  #00  pc 00000000007d7e9c  /data/app/-/oat/arm64/base.odex (offset 0x765000)

and I tried below before,

v2.5.1.2 sdkboxads
v2.5.1.2 admob

I received the same report.

Thank you.

1 post - 1 participant

Read full topic

Received a notification in AdMob for updates in iOS apps

$
0
0

Prepare your apps for iOS 14 Apple announced the new AppTrackingTransparency framework, which requires changes to your iOS apps. Implement the GMA SDK 7.64.0 (or later) and set up consent messaging to help prevent a significant loss in ad revenue.

what is it?

1 post - 1 participant

Read full topic

Cocos 3D - merge

Camera with FBO does not clear DepthBuffer

$
0
0

Hello
I’m trying to implement a kind of CCTV window, showing 3d scene.

For the test, added code bellow in
\cocos2d-x-3.17.2\tests\cpp-tests\Classes\Camera3DTest
Camera3DTest.cpp Camera3DTestDemo::onEnter() - line 351

    if (_camera == nullptr)
    {
        _camera=Camera::createPerspective(60, (GLfloat)s.width/s.height, 1, 1000);
        _camera->setCameraFlag(CameraFlag::USER1);
        _layer3D->addChild(_camera);
        // added code-----------------------------------------------------------------------------
        Size fboSize = Size(512,384);
        auto fbo = experimental::FrameBuffer::create(1, fboSize.width, fboSize.height);
        auto rt = experimental::RenderTarget::create(fboSize.width, fboSize.height);
        auto rtDS = experimental::RenderTargetDepthStencil::create(fboSize.width, fboSize.height);
        fbo->attachRenderTarget(rt);  
        fbo->attachDepthStencilTarget(rtDS); // commenting this line will render 3d scene without depth test 
        fbo->setClearColor(Color4F(0.25,0.25,0.25,1));
        _camera->setFrameBufferObject(fbo);

        auto sprite_scr = Sprite::createWithTexture(fbo->getRenderTarget()->getTexture());
        sprite_scr->setFlippedY(true);
        sprite_scr->setPosition(Vec2(s.width/2, s.height/2));
        addChild(sprite_scr,-2);
        // ----------------------------------------------------------------------------------------
    }

It just renders grey window with this code.
case_with_depthbuffer

but, without depthbuffer by commenting this line
fbo->attachDepthStencilTarget(rtDS);

renders 3d scene without depth test.
case_without_depthbuffer

It seems like depth buffer is not working.
or Am I missing some setup code?

Any Help would be appreciated.

1 post - 1 participant

Read full topic

Sound engine vs mute vs bad reviews?

$
0
0

Hi,

we’re getting quite a few 1-star reviews from iOS users (not all of them) complaining about no sound in our games. (As our games’ main purpose it to teach little children English, sound is crucial and the games are useless without it).

I have checked the app for bugs and I strongly suspect this is just because they have their mute switches turned on.

I have answered all of the reviewers, but in the long term it’s a bit difficult to instruct all of them to turn the switch off. I guess since apps like YT etc. work on mute (should they really, though? :/), they don’t even think about this button at all.

Question nr 1: any suggestions? Has anyone faced a similar problem?

Question nr 2: is it possible to somehow detect that mute is on and pop an alert for the user that the game will not work until they turn the silent mode off?

Question nr 3: is there any way of forcing the audio to work, like on YT app, despite the mute button being turned on? (yep, I know… it’s not the best option, but I’m unsure how to tackle this)

Our target group is parents, not gamers - that’s probably the main problem :P.

2 posts - 2 participants

Read full topic

Tutorial: Building a Radar Chart for your next game in Cocos Creator!

$
0
0

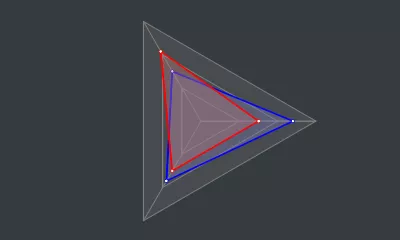
A radar chart (also known as a network chart, star chart, or spider web chart) is a graphical method of displaying multivariable data in the form of a two-dimensional chart of three or more quantitative variables on the axis starting from the same point.

A radar chart can be used for statistics or comparisons. It is handy to see which variables have similar values ​​and whether there are outliers between variables.

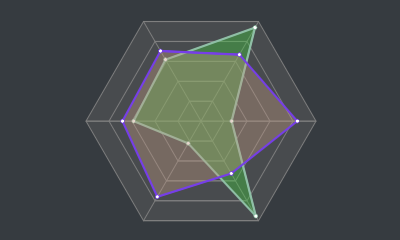
For example, it is used in the music selection menu in Dance Dance Revolution games:

image

In this article, Pippi from Rookie Little Stack (a group that shares tutorials on Cocos Creator and how to build shaders) will share how to draw cool radar charts in Cocos Creator. The original code was reduced to a certain extent, to ensure a great reading experience. Those who need the complete code file can get it here.

What should we expect after reading this tutorial?

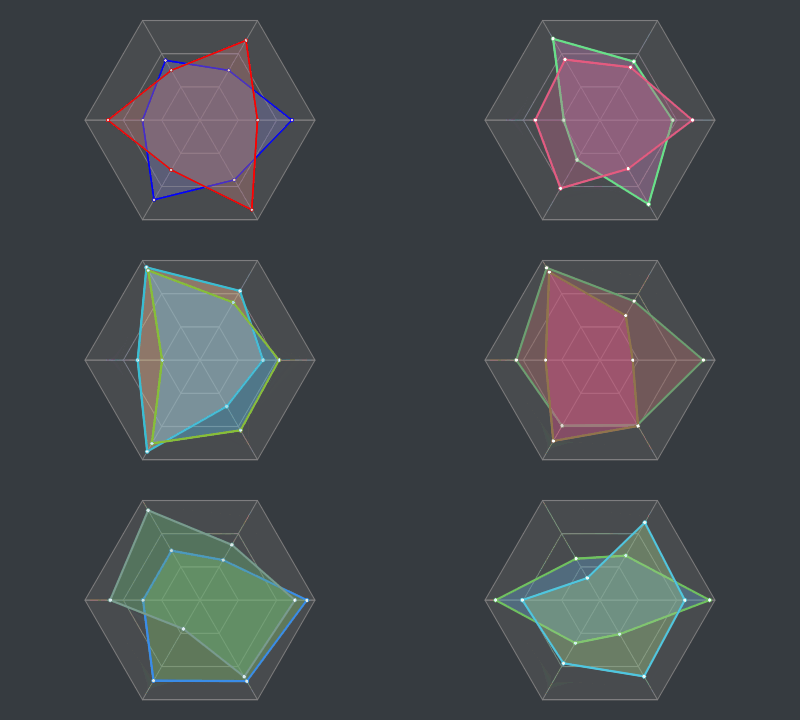
A final product, such as:

Simple

image

Complex

640

Before formally starting to make radar charts, it is necessary to have a general understanding of the graphics component in the Cocos Creator engine.

The graphics component inherits from the cc.RenderComponent. With this component, we can implement functions such as drawing lines and filling in polygrams.

Properties

Here are the attributes that will use this time:

  • lineCap: Set or return the style of both ends of the line (none, round cap or square cap)
  • lineJoin: Set or return the corner style when two lines intersect (bevel, rounded or sharp)
  • lineWidth: Set or return the thickness of the current brush (the width of the line)
  • strokeColor: Set or return the color of the current pen
  • fillColor: Set or return the color used for filling (paint bucket)

Functions

Here are the functions that will use this time:

  • moveTo(x, y): Lift the pen and move it to the specified position (do not create a line)
  • lineTo(x, y): Put down the brush and create a straight line to the specified position
  • circle(cx, cy, r): Draw a circle at the specified position (cx, cy is the center of the circle)
  • close(): Close the created line (equivalent to lineTo(x,y))
  • stroke(): Draw a line that has been created (but not drawn) (think of the line as transparent by default, this behavior is to give the line color)
  • fill(): Fill the area enclosed by the current line (if the line is not closed, it will try to “simulate closed” start and endpoints)
  • clear(): Wipe everything on the current drawing board

For more information, please refer to the Graphics Component documentation.

Properties of a Radar Chart

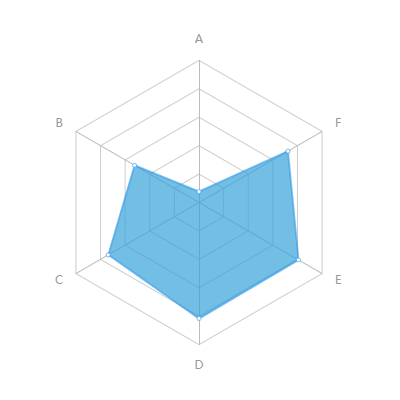
Let’s take a look at the characteristics of a standard radar chart:

image

The basic characteristics of the radar chart are as follows:

  • There are three or more axes
  • The angle between the shafts and the other shafts are the same
  • There should be at least one scale on each axis except the center point
  • Each axis has the same number of scales
  • The distance between each scale is the same
  • The scales between the axes are connected to form a grid line

Let’s Build it

Calculate the axis angle

Calculate the number of angles between the shafts [360 ÷ number of axis], and then calculate the angles of all shafts:

this.angles = [];
//Angle between shafts
const iAngle = 360 / this.axes;
for (let i = 0; i < this.axes; i++) {
    // Calculate
    const angle = iAngle * I;
    this.angles.push(angle);
}

Calculate scale coordinates

The radar chart has at least three axes, and each axis should have one or more scales (not including the center point).

image

A two-dimensional array is needed to save the coordinates of all scales, starting from the outermost scale (that is, the end of the axis) to record, so that we can read it when drawing:

// Create a two-dimensional array
let scalesSet: cc.Vec2[][] = [];
for (let i = 0; i < number of scales on the axis; i++) {
    // Used to save the scale coordinates on the current layer
    let scales = [];
    // Calculate the position of the scale on the axis
    const length = Axis length - (Axis length / Number of scales on the axis * i); 
    for (let j = 0; j < this.angles.length; j++) {
        // Calculate the position of the scale on the axis
        const radian = (Math.PI / 180) * this.angles[j];
        // Calculate the coordinates of the scale relative to the center point (0, 0) according to the trigonometric formula
        const pos = cc.v2(length * Math.cos(radian), length * Math.sin(radian));
        // Advance array
        scales.push(pos);
    }
    // Advance two-dimensional array
    scalesSet.push(scales);
}

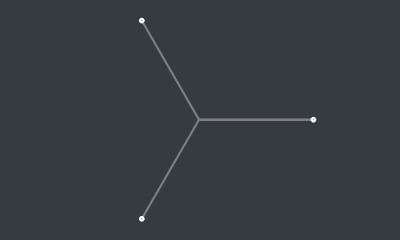
Draw axis and outer grid lines

Axis

Connecting a center point (0, 0) and an outermost layer scalesSet[0] of the scale is the axis:

// Traverse all the outermost scales
for (let i = 0; i < scalesSet[0].length; i++) {
    // Move the pen to the center point
    this.graphics.moveTo(0, 0);
    // Create lines
    this.graphics.lineTo(scalesSet[0][i].x, scalesSet[0][i].y);
}

Outer grid

All axes connecting outermost layer scalesSet[0] of scale that formed on the outer grid lines:

// The pen moves to the first point
this.graphics.moveTo(scalesSet[0][0].x, scalesSet[0][0].y);
for (let i = 1; i < scalesSet[0].length; i++) {
// Create lines
this.graphics.lineTo(scalesSet[0][i].x, scalesSet[0][i].y);
}
// Close the current line (outer grid line)
this.graphics.close();

Fill and draw

Here you need to pay attention to fill the color first and then draw the line, otherwise the axis and grid lines will be behind the chart and can’t be seen:

// Fill the blank area surrounded by lines
this.graphics.fill();
// Draw the created lines (axis and outer grid lines)
this.graphics.stroke();

Example:

image .

Draw inner grid lines

When the scale is greater than 1, the inner grid lines need to be drawn, starting from the subscript 1 of the scale coordinate set:

// Draw inner grid lines only when the scale is greater than 1
if (scalesSet.length > 1) {
    // Start from the bottom 1 (subscript 0 is the outer grid line)
    for (let i = 1; i < scalesSet.length; i++) {
        // The pen moves to the first point
        this.graphics.moveTo(scalesSet[i][0].x, scalesSet[i][0].y);
        for (let j = 1; j < scalesSet[i].length; j++) {
            // Create lines
            this.graphics.lineTo(scalesSet[i][j].x, scalesSet[i][j].y);
        }
        // Close the current line (inner grid line)
        this.graphics.close();
    }
    // Draw the created line (inner grid line)
    this.graphics.stroke();
}

The foundation of the radar chart is drawn:

image

Stroke

Before cosing the line drawing logic, first, determine the data structure that is need:

  • Numerical array - required, the ratio in decimal form, containing at least three values.
  • Line width - optional, use the default value if not specified.
  • Line color - optional, use the default value if not specified.
  • Fill color - optional, use the default value if not specified.
  • The color of the node - optional, use the default value if not specified.

The specific data structure is as follows (the export type is convenient for external use):

/*Radar chart data*/
export interface RadarChartData {

    /* Values */
    values: number[];

    /* Line width */
    lineWidth?: number;

    /* Line color */
    lineColor?: cc.Color;

    /* Fill color */
    fillColor?: cc.Color;

    /* Node color */
    joinColor?: cc.Color;

}

Do it

Plotting the data is relatively simple. Developers only need to figure out the position of the data point in the chart and connect the data.

In the draw function that receives a radar or more map data, and drawn in the order of traversal:

/**
    * Plot data
    * @param data 
    */
public draw(data: RadarChartData | RadarChartData[]) {
    // data processing
    const datas = Array.isArray(data) ? data : [data];

    // Start plotting data
    for (let i = 0; i < datas.length; i++) {
        // Load colors
        this.graphics.strokeColor = datas[i].lineColor || defaultOptions.lineColor;
        this.graphics.fillColor = datas[i].fillColor || defaultOptions.fillColor;
        this.graphics.lineWidth = datas[i].lineWidth || defaultOptions.lineWidth;

        // Calculate node coordinates
        let coords = [];
        for (let j = 0; j < this.axes; j++) {
            const value = datas[i].values[j] > 1 ? 1 : datas[i].values[j];
            const length = value * this.axisLength;
            const radian = (Math.PI / 180) * this.angles[j];
            const pos = cc.v2(length * Math.cos(radian), length * Math.sin(radian))
            coords.push(pos);
        }

        // Create lines
        this.graphics.moveTo(coords[0].x, coords[0].y);
        for (let j = 1; j < coords.length; j++) {
            this.graphics.lineTo(coords[j].x, coords[j].y);
        }
        this.graphics.close(); // 闭合线条
        
        // close lines
        this.graphics.fill();
        // Draw lines
        this.graphics.stroke();

        // Draw data node
        for (let j = 0; j < coords.length; j++) {
            // Big circle
            this.graphics.strokeColor = datas[i].lineColor || defaultOptions.lineColor;
            this.graphics.circle(coords[j].x, coords[j].y, 2);
            this.graphics.stroke();
            // Little circle
            this.graphics.strokeColor = datas[i].joinColor || defaultOptions.joinColor;
            this.graphics.circle(coords[j].x, coords[j].y, .65);
            this.graphics.stroke();
        }

    }
}

A successfully produced and usable radar chart:

image

Can we make it move?

  • The completely static radar chart is too dull and ordinary, you have to find a way to make it move!
  • The values of our radar chart data are in the form of arrays. Have you thought of how to make these values move?

Thanks to the Tween easing system provided by Cocos Creator, it makes complex data very easy to move!

Only cc.tween is needed to support the ease of any property of any object.

For more information, please refer to the Easing System documentation.

Another idea

The idea is:

  1. Save the current data to the current instance this.curDatasof
  2. Upon receipt of the new data, the use cc.tween of this.curDatathe attribute easing
  3. In the update() call draw function, redrawn every frame this.curDatas data

Updating every frame

// Current radar chart data
private curDatas: RadarChartData[] = [];

protected update() {
    if (!this.keepUpdating) return;
    // plot current data
    this.draw(this.curDatas);
}

Easing data

/**
    * Easing drawing
    * @param data target data
    * @param duration Animation duration
    */
public to(data: RadarChartData | RadarChartData[], duration: number) {
    // Handling repeated calls
    this.unscheduleAllCallbacks();
    
    // Packing the list data
    const datas = Array.isArray(data) ? data : [data];

    // Open every frame update
    this.keepUpdating = true;

    // Let’s write!
    for (let i = 0; i < datas.length; i++) {
        // The value moves!
        // Traverse all the values in the data and make them move one by one!
        for (let j = 0; j < this.curDatas[i].values.length; j++) {
            // Limit the maximum value to 1 (that is, 100%) 
            const value = datas[i].values[j] > 1 ? 1 : datas[i].values[j];
            cc.tween(this.curDatas[i].values)
                .to(duration, { [j]: value })
                .start();
        }
        // The style changes!
        // If not specified, use the original style!
        cc.tween(this.curDatas[i])
            .to(duration, {
                lineWidth: datas[i].lineWidth || this.curDatas[i].lineWidth,
                lineColor: datas[i].lineColor || this.curDatas[i].lineColor,
                fillColor: datas[i].fillColor || this.curDatas[i].fillColor,
                joinColor: datas[i].joinColor || this.curDatas[i].joinColor
            })
            .start();
    }

    this.scheduleOnce(() => {
        // Turn off every frame update
        this.keepUpdating = false;
    }, duration);
}

1 post - 1 participant

Read full topic

How do I fix game loading problem in Firefox?

$
0
0

Game does not load second time on Firefox .First time game loading successfully but second time some error occurs.
Version - Cocos creator(2.4.2)
Build - Web-mobile

We do not know how to fix this problem. Has anybody an idea, why this error occurs?

I hope anybody can help us.!

2 posts - 2 participants

Read full topic


"ccconsole.h, ccutf8.h error, expected a {"

$
0
0

Hello there, I have encountered a very problematic bug. I cannot build my project, because I keep getting these errors


Basically it gives of an error code that signifies there are missing braces/semicolons in the syntax.
These files though were not created by me and they are cocos2dx header files.
If someone could please visit these lines in those files and check what possibly could have happened it would be great.

This is how the lines look like for me:

ccutf8.h line 66

ccconsole.h line 63

15 posts - 3 participants

Read full topic

Sdkbox latest version (2.7.1.0) issue with pre-launch report

$
0
0

I recently updated with the latest version of sdkbox 2.7.1.0 to update admob specifically to remove uiWebview. On IOS, all is fine. However, I have a problem with Android. The pre-launch report reports a bug with one specific device (Pixel on Android 7.1). The app does not crash, it just do not launch. It tries to launch for a while, then the pre-launch robot stops and shut down the app. I tried different combination:

PROP_TARGET_SDK_VERSION 27, 28, 29.
PROP_BUILD_TOOLS_VERSION 29.0.3, 27.0.3
com.google.android.gms:play-services-ads:17.2.0, 18.3.0, 19.3.0
com.google.android.gms:play-services-base:16.1.0 or just no service-base at all

And they all end up with the same result. All devices pass except Pixel on 7.1.(I have no problem on my test devices however I do not have a 7.1 to try with). I contacted Google and they said there are no known issue with this device.

The only way I was able to make it work is by replacing the PluginAdMob.jar by the previous one and it works. Well kinda. It seems to work, I published the app, but some Huawei devices gets a crash

: #00 pc 000000000006bd00 /system/lib64/libc.so (tgkill+8)
#01 pc 000000000006919c /system/lib64/libc.so (pthread_kill+64)
#02 pc 0000000000023e68 /system/lib64/libc.so (raise+24)
#03 pc 000000000001c8ec /system/lib64/libc.so (abort+52)
#04 pc 000000000042e5f8 /system/lib64/libart.so (art::Runtime::Abort()+352)
#05 pc 00000000000e5424 /system/lib64/libart.so (art::LogMessage::~LogMessage()+1204)
#06 pc 0000000000451124 /system/lib64/libart.so (art::thread::AssertNoPendingException() const+836)
#07 pc 00000000001247d8 /system/lib64/libart.so (art::ClassLinker::FindClass(art::Thread*, char const*, art::Handleart::mirror::ClassLoader)+68)
#08 pc 0000000000324e50 /system/lib64/libart.so (art::JNI::FindClass(_JNIEnv*, char const*)+2780)
#09 pc 0000000000379160 /data/app/com.bewgames.templeruins-1/lib/arm64/libMyGame.so (sdkbox::JNIUtils::GetClassObjectFromName(char const*, _JNIEnv*)+48)
#10 pc 00000000003796c8 /data/app/com.bewgames.templeruins-1/lib/arm64/libMyGame.so (sdkbox::JNIUtils::GetJNIStaticMethodInfo(char const*, char const*, char const*, _JNIEnv*)+56)
#11 pc 00000000003759c4 /data/app/com.bewgames.templeruins-1/lib/arm64/libMyGame.so (sdkbox::SdkboxCore::isGooglePlayServicesAvailable()+136)
#12 pc 0000000000362570 /data/app/com.bewgames.templeruins-1/lib/arm64/libMyGame.so
#13 pc 000000000035fd90 /data/app/com.bewgames.templeruins-1/lib/arm64/libMyGame.so (sdkbox::SdkboxCore::sessionStart()+280)
#14 pc 000000000035fe44 /data/app/com.bewgames.templeruins-1/lib/arm64/libMyGame.so (sdkbox::SdkboxCore::onStart()+36)
#15 pc 00000000007f6d3c /data/app/com.bewgames.templeruins-1/oat/arm64/base.odex (offset 0x7b5000)

So I assume the old jar file is missing a class or something. But why only 2-3 specific huawei device? This is unknown. Anyway, this is kind of a patch that I should not have to do.

I also tried to download the sdkbox files manually, and import them manually. Same result.

Anyone else had the same issue? Any idea what could be happening?

3 posts - 3 participants

Read full topic

Game Package Installation Failed (Oppo Mini Game)

$
0
0

Hi!
I made a 3D game and when I am trying to build it in “Oppo Mini Game” platform and then placed the .rpk file in sdcard/game folder, and then open “Quick App” and play it then it show me an error message in Chinese language, whose translation is : “Game Package Installation Failed”.
Any one know about this error. . ?
Please help me out, I am looking forward to it. .

2 posts - 2 participants

Read full topic

Some Newly Created Nodes Appear at the Bottom-Left Corner of the Scene Despite the Set Position

$
0
0

So I got an instance of DrawNode, called Food, which is essentially just a solid yellow circle, created through this static method:

DrawNode* Food::create(const Vec2 &position)
{
    auto node = DrawNode::create();
    node->setPosition(position);
    node->drawDot(Vec2::ZERO, 5, Color4F::YELLOW);

    auto physicsBody = PhysicsBody::createCircle(5, PHYSICSBODY_MATERIAL_DEFAULT);
    physicsBody->setDynamic(false);
    physicsBody->setCategoryBitmask(2);
    physicsBody->setCollisionBitmask(1);
    physicsBody->setContactTestBitmask(1);
    node->addComponent(physicsBody);
    
    return node;
}

As you can see, it got a static physics body, used for collision detection. I set the position immediately after creation of the DrawNode. The dot and physics objects are placed relative to the position of the DrawNode (their parent), with zero offset.

Here’s the callback which is called right when contact between two objects is made:

bool MainScene::onContactBegin(PhysicsContact &contact)
{
    auto bodyA = contact.getShapeA()->getBody();
    auto bodyB = contact.getShapeB()->getBody();

    auto categoryBitmaskA = bodyA->getCategoryBitmask();
    auto categoryBitmaskB = bodyB->getCategoryBitmask();

    if (categoryBitmaskA != categoryBitmaskB)
    {
        if ((categoryBitmaskA == 1 && categoryBitmaskB == 2) || (categoryBitmaskA == 2 && categoryBitmaskB == 1))
        {
            auto foodNode = (categoryBitmaskA == 2 ? bodyA : bodyB)->getNode();
            if (foodNode != nullptr)
            {
                this->removeChild(foodNode);
                this->addFood(1);
            }

            return false;
        }

        return true;
    }

    return false;
}

As you can see, when a food instance collides with a body of a specific category mask, it gets destroyed and a new method MainScene::addFood is called to add a new instance.

So here’s how the method for adding new food looks like:

void MainScene::addFood(int count)
{
    auto visibleSize = Director::getInstance()->getVisibleSize();

    for (int i = 0; i < count; i++){
        auto location = Vec2(random((float)10, (float)(visibleSize.width - 10)), random((float)10, (float)(visibleSize.height - 10)));
        
        auto food = Food::create(location);
        this->addChild(food, 0, "food" + std::to_string(this->index));
        this->index++;
    }
}

As you can see, new food instances are created and placed randomly within the visible portion of the scene, using the Food::create method I’ve previously mentioned.

Now the thing is that when food instances are added to the scene in the MainScene::init method or using a scheduler, everything works as expected - new food instances are added in random positions within the visible portion of the scene.

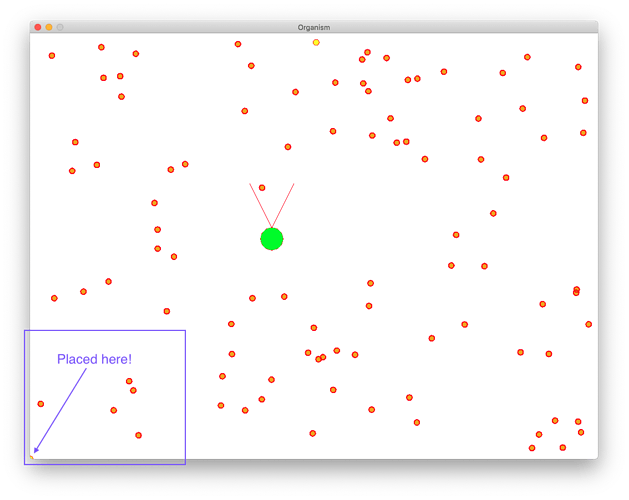
However, when the Main::onContactBegin method triggers creation of food instances, things go wrong. That is, some food instances are placed in positions as specified using DrawNode::setPosition, but rest of them are placed at the bottom-left corner of the scene! You can see for yourself in the screenshot below:

Now if I modified portions of the Food::create method to create the dot and the physics body in the specified position, instead of being relative to the DrawNode, and setting the position of the DrawNode, things work perfectly:

DrawNode* Food::create(const Vec2 &position)
{
    auto node = DrawNode::create();
    // node->setPosition(position);
    node->drawDot(position, 5, Color4F::YELLOW); // Dot is centered on the specified position!

    auto physicsBody = PhysicsBody::createCircle(5, PHYSICSBODY_MATERIAL_DEFAULT, position); // Physics body has an offset equal to the specified position
    physicsBody->setDynamic(false);
    physicsBody->setCategoryBitmask(2);
    physicsBody->setCollisionBitmask(1);
    physicsBody->setContactTestBitmask(1);
    node->addComponent(physicsBody);
    
    return node;
}

Can anyone explain what is causing such behavior?

1 post - 1 participant

Read full topic

Black background element

$
0
0

I’m pulling my hair out on this. I’m still pretty new to coding.
I’ve got a cocos creator project with a VideoPlayer component, and I wish for the video to have other renderable nodes overlaying it.
I’ve checked the “Stay On Bottom” checkbox.
Following the docs, I went into the cocos2d/core/platform/CCMacro.js file, and changed the ENABLE_TRANSPARENT_CANVAS boolean to true.

This results in my cocos elements definitely overlaying the video. I hear it playing in the background, and if I check off “Everything” (which also checks off “default” from cullingMask under camera), I’ll see the video play out, underneath a black rectangle that’s as big as my cocos canvas.

I’ve only got 1 other node that has a renderable elements (a label).

I later tried making the backgroundColor of Main Camera have 0 alpha, but that black rectangle still never goes away.
(First, I tried doing it from the GUI editor, in Main Camera’s Background Color property, and then I tried doing it by code, and added cc.Camera.main.backgroundColor(0,0,0,0); to my main script’s start() method - neither did anything about the black rectangle).

In Chrome’s dev tools, in the CSS section, I’ve changed background color to be transparent, but it doesn’t change that rectangle.

I’ve console-logged cc.macro.ENABLE_TRANSPARENT_CANVAS inside the start() method, and it says that it’s false, despite having changed the boolean in the JS file mentioned above. Maybe that’s it, but if changing it in said JS file doesn’t work, then I’m not sure where else to look.

I don’t know if anything I’m doing is even right, or if I’m just making things worse.

Before using the Stay On Bottom option, I was using the method in this stackoverflow answer to accomplish my video overlay: https://stackoverflow.com/questions/59064897/video-player-always-stay-at-the-top-in-cocos-creator
It yielded the same results.

Testing using Browser, using Chrome, on a Windows 10 PC.
CC version 2.3.4 (cause of work, can’t upgrade this yet)
Dunno if it matters that I’m using TypeScript?
I don’t know what other information to pass along, but I’ll gladly provide.
Any help is appreciated!

2 posts - 2 participants

Read full topic

Viewing all 17083 articles
Browse latest View live


<script src="https://jsc.adskeeper.com/r/s/rssing.com.1596347.js" async> </script>