Quantcast
Channel: Cocos Forums - Latest topics
Viewing all 17056 articles
Browse latest View live

Cannot set particle texture

$
0
0

Hi there. I am trying to set a particle texture but it does not work.


I made my particles using the particle2dx editor.
The problem is, when I tried to add the .plist which included the PNG data, the particles wouldnt show up at all.
Now I am trying to set the particle texture manually, but it is not working.
Am I missing something obvious?

3 posts - 2 participants

Read full topic


Tutorial: Cocos Creator performance optmization: DrawCall

$
0
0

Tutorial: Cocos Creator performance optimization: DrawCall

Probably the most comprehensive Cocos Creator DrawCall optimization guide you can find so far!

Preface

In game development, DrawCall, is a very important performance indicator, it directly affects the overall performance of the game.

Whether it’s Cocos Creator, Unity, Unreal or some other game engine, as long as it comes to game performance optimization, DrawCall is absolutely indispensable. What is a DrawCall? Why is it necessary to reduce DrawCall whenever possible?

Let’s find out!!

What is a DrawCall?

DrawCall is a behavior (instruction), which is, the CPU calls the graphics API and instructs the GPU to draw graphics.

Why reduce DrawCall?

What are we talking about when we are talking about reducing DrawCall?

In fact, what we really need to reduce is not the DrawCall behavior itself, but to reduce some performance and time-consuming behaviors before each DrawCall.

Rendering

The general flow of the graphics rendering pipeline is as follows:

Note: The above figure is only a partial summary of the rendering pipeline, which is convenient for everyone to understand. The actual graphics rendering pipeline is more complicated and beyond the scope of this article.

Note: It can be seen from the figure that in the rendering pipeline, before each DrawCall, the CPU needs to do a series of preparations to allow the GPU to render the image correctly. Every CPU read/write, data processing and rendering state switching will bring certain performance and time consumption.

Whose work is it?

Generally speaking, the GPU rendering image speed is actually very fast, so the time consumed for drawing 100 triangles and drawing 1000 triangles is not much different.

But the read and write memory of the CPU, data processing, and changing the rendering state of the GPU rendering is very, very slow.

The actual bottleneck is on the CPU side. A large number of DrawCalls will make the CPU so busy that it will be overwhelmed, and the GPU will spend most of the time waiting, which is the main reason for the decline in game performance.

The fewer DrawCalls, the better.

How to reduce DrawCalls?

When the game is running, the engine needs to render images from the top to bottom of the screen as well as in the order of the node hierarchy. So, in theory, a DrawCall is required for every image rendered (text is ultimately an image).

In this case, as long as we find a way to render as many images as possible in one DrawCall (also known as a rendering batch), we can call the CPU as little as possible, thereby reducing the amount of DrawCalls.

So we need to reduce the number of times the CPU works, but give it a lot more work every time, so you can save some steps on the CPU preparation and work requirements and hand off the work to the GPU processing. The cost is of having the CPU working all the time will take more time if more requests are asked for.

After understanding this principle, let’s see how we put this into actual game development.

Static image

The final static image is an integration of a series of smaller images into one big picture during development.

Using an atlas is very important for DrawCall optimization, but it does not mean that we can integrate all the pictures into the atlas. There are also some special points in it. If you randomly integrate the pictures into an atlas, it may become worse for optimization.

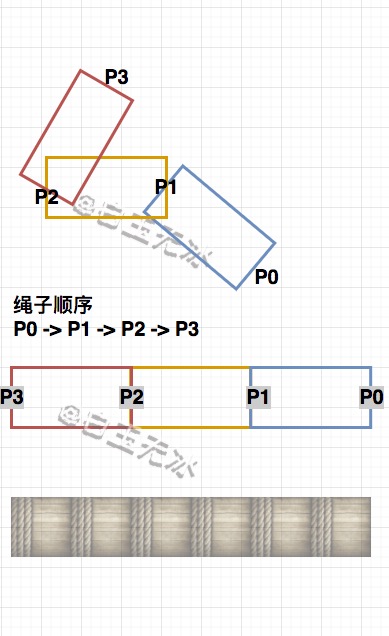
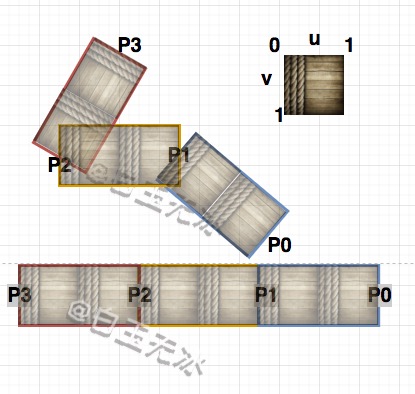
The most important thing is to try to pack adjacent fragments under the same interface (UI) with the same rendering state into one atlas to achieve the purpose of reducing DrawCalls.

Remember that the game is rendered in-order. So rendering adjacent items is very important!

Changing the rendering state will also interrupt the rendering batch, such as changing the texture state (pre-multiplied, loop mode, and filtering mode) or changing the Material, Blend (mixing mode), etc. Using a custom shader will also interrupt the batch.

For example, think about a pop-up window consisting of 10 parts and 1 text (assuming that they all use the same rendering method):

  1. Without any optimization and the dynamic combination is not turned on, 11 DrawCalls are required to render this pop-up window.

  2. Combine all the images into one atlas. When the text node is sandwiched between the sprite nodes, 3 DrawCalls are needed, with 2 DrawCalls needed for the outermost layer at the top and the outer layer at the bottom.

  3. The text uses BMFont. If all the pictures and BMFont are combined into one atlas, only one DrawCall is needed.

  4. Images are not packed into the atlas and are opened through a dynamically combined picture. In an ideal situation, using BMFont for text requires at least 1 DrawCall.

If you don’t understand the above example, please continue to read the following. I believe that you will get a better understanding of this article after reading the entire content of this article.

The dynamic combination picture and BMFont will be mentioned later.

Of course, the above example is considered to be an ideal situation. The actual problem may be more complicated, with more sprites and texts, and it may not be possible to pack all image resources into one atlas. Therefore, we can only optimize as reasonably as possible to avoid the situation over-optimizing.

It is not recommended that the size of any image resources exceed 2048 * 2048, otherwise, there may be problems in small games and native platforms.

And the larger the image size, the longer the loading time, and it is a non-linear growth. For example, loading one image takes longer than loading two images, and the gain is more than the loss.

Here are two ways to package a static atlas:

  1. Auto Atlas

    Use Cocos Creator’s built-in automatic atlas allows you to package images into atlases.

    When the project is built, the editor will package all the images that meet the requirements in the folder where all the automatic atlas resources are located into one or more atlas according to the configuration.

    Automatic Atlas has a flexible use of resources. The editor automatically creates subdirectories recursively when packaging atlas. If there are subdirectories that have Atlas resources (i.e.pacfiles) it will be skipped.

    Learn more about AutoAtlas from the documentation

  2. Create automatic atlas configuration

    In the Explorer Panel, right-click on New -> Atlas Auto Configuration and this will create a resource names AutoAtlas.pacresource.

    image

  3. Configuration properties

    In the Explorer Panel, click on the file will be automatically Atlas resources in the Property inspector to see the properties automatically in a configurable panel. Click the Preview button to preview the Atlas.

    Some tips about automatic atlas

    1. Properly control the maximum size of the atlas to avoid long loading times for a single image.

    2. Images that are too large are not always included in the atlas (such as background images).

    3. Making good use of slices can save a lot of space (this requires the cooperation of art experts).

    4. Keep the default padding at 2 and keep the option of expanding edges checked to avoid image cropping errors and black edges.

    5. Check the Filter unused resources option to automatically exclude unused images to save space (this option is invalid during preview).

    6. Preview the atlas during development and adjust according to the results to achieve the best optimization effect.

    Please refer to the official documentation for the specific role of each attribute.

  4. TexturePacker

    We can also use the third-party software TexturePacker to pre-package the images into atlases and import them into the project.

    TexturePacker is a paid software, but in general, the free functions are enough.

    TexturePacker official website

    Comparison of Auto Atlas and TexturePacker

    1. Auto Atlas

      • Cocos Creator is built-in, making it easy to use

      • There are not many functions, but everything that should be available is there for free

      • The atlas is only generated when the project is built, and there is no pressure to modify it during development

      • The size of the atlas is adaptive during development, saving space

      • Supports automatic texture compression

    2. TexturePacker

      • Third-party software needs to be installed by yourself, which is not convenient.

      • Many paid functions are professional but not needed, and the free functions are enough.

      • First generate the atlas and then use it, change the image and then regenerate the atlas

      • Fixed size needs to be set by yourself

      • Compress it yourself

Summary: Auto Atlas is usually the best option

Dynamic Atlas

Here is the introduction of Dynamic Atlas that comes from the official document:

Cocos Creator provides a static atlas packing when building a project - Auto Atlas. But when the project grows bigger, the texture will become so much that it’s hard to package the textures into a large texture. At this time, the static atlas packing is more difficult to meet the needs of reducing DrawCall. So Cocos Creator added the Dynamic Atlas, featured in version 2.0. It dynamically merges textures into a large texture while the project is running. When rendering to a texture, the Dynamic Atlas Manager will automatically detect if the texture has been merged into the atlas (Collection of images). If not, and the texture conforms to the Dynamic Atlas condition, then the texture will be merged into the atlas.

Dynamic Atlas is according to the rendering order to determine whether the texture is merged into a large texture. This ensures that adjacent DrawCall can be combined into a single DrawCall (also known as Batching).

Dynamic Atlas documentation.

To put it simply, after the dynamic combination is turned on, the engine will help us to combine the images that meet the conditions (that is, the size is less than the maximum size of the image limit) at runtime, achieving the same effect as pre-packing the atlas.

In the Cocos Engine, Dynamic Atlas has a maximum size of 2048 * 2048, the combined maximum size limit of textures are 512, the user can modify the following API:


cc.dynamicAtlasManager.maxFrameSize = 512;

Enabling dynamic image combining will take up additional memory, and the memory size used by different platforms is different. Dynamic image combining is disabled by default on mini games and native platforms, but if you still have enough memory space in your project, it is recommended to force it on:


cc.macro.CLEANUP_IMAGE_CACHE = false;

cc.dynamicAtlasManager.enabled = true;

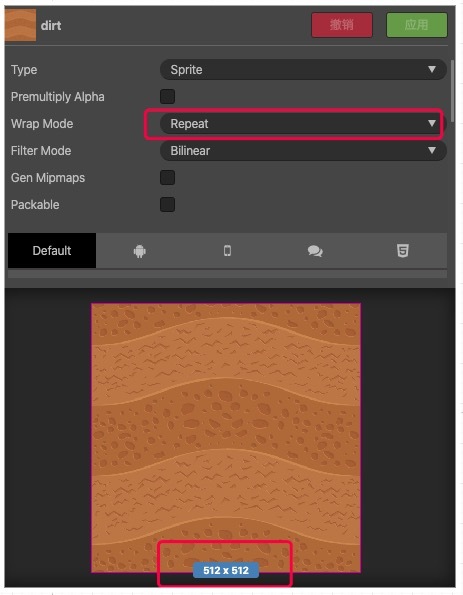
In addition, it is necessary to ensure that the Premulyiply Alpha, Wrap Mode, and Filter Mode of the texture are consistent with the dynamic atlas in order to be dynamically batched.

image

Static atlas can also participate in dynamic combined images

It is mentioned in the official document of dynamic combination:

When rendering a texture, the dynamic combination system will automatically detect whether the texture has been merged into the atlas. If not, and the texture meets the conditions of dynamic combination, it will be the texture Merged into the gallery.

But in fact, as long as a static texture meets the requirements of a dynamic Atlas (ie size smaller than the maximum size limit), also can participate in Dynamic Atlas.

Note: Auto Atlas needs to enable the Packable option under the Texture column in its property inspector panel, which is disabled by default.

Additional supplement

Only the sprites with the Packable option enabled for textures can participate in dynamic image combining, which is enabled by default.

image

After the texture participates in the dynamic combination, the UV coordinates of the original texture will be modified, so the UV coordinates in the Shader cannot be calculated correctly, which causes the Shader to be invalid.

Note: If you need to use a custom Shader for the sprite, you need to disable the Packable option of its texture.

You can also disable this option in the code:


let sprite = this.node.getComponent(cc.Sprite);

let texture = sprite.spriteFrame.getTexture();

texture.packable = false;

Packable documentation.

Bitmap font (BMFont)

Labels that use system fonts or TTF fonts in the scene will interrupt the rendering and batching, especially when the Label and Sprite are stacked and interlaced. Each Label will interrupt the batching and add a DrawCall, which is a problem when a scene has a lot of text.

For the game’s text, in particular numbers, letters and symbols, it is recommended to use BMFont to replace the TTF fonts or system, and BMFont can be packed into the same atlases (or open the dynamic Graph), making them exempted from most of the text that would result in an additional DrawCall.

For example, there are 80 sprites and 80 texts (system fonts) interlaced in a scene. The node hierarchy is as follows:

image

After running it, you can see that in the Debug section in the lower-left corner shows that there are as many as 161 DrawCalls, which means that each sprite and text adds a DrawCall. In this case, even if the sprite opens the atlas, it will not help.

You might be asking if there are only 80 sprites and 80 texts, shouldn’t there be 160 DrawCalls? Why is there 161…?

Because the Debug section in the lower-left corner also accounts for one

Still in the above scene, try to change the system font of the Label to BMFont and pack it into the same atlas with the sprites, the same is 80 sprites and 80 texts.

There are only two DrawCalls, and the frame time is reduced to 1ms, the frame rate is increased by 10 FPS, and the rendering time is reduced to 0.6ms.

The scene only occupies 1 DrawCall, and the other DrawCall is occupied by the debugger in the lower left corner.

Text cache mode (Cache Mode)

Cocos Creator 2.0.9 version adds the Cache Mode option to the Label component to solve the performance problems caused by system fonts and TTF fonts.

Cache Mode documentation.

Cache Mode has the following three options:

  1. NONE (default)

    Each Label will be generated as a separate bitmap and will not participate in the dynamic combination of images, so each Label will interrupt the rendering batch.

  2. BITMAP

    When the Label component BITMAP mode is turned on, the text will also be generated as a bitmap, but will try to participate as a part of the Dynamic Atlas if it meets the requirements.

    Note: BITMAP mode is only suitable for texts that are not frequently changed, otherwise the memory will explode at your own risk!

    The result is that all sprites (including background) and text are successfully combined dynamically, and the actual DrawCall is reduced to 1.

    Therefore, in the current situation (less sprites and more text), it is a better choice instead of drawing an atlas.

  3. CHAR

    When the Label component turns on the CHAR mode, the engine will cache all the characters appearing in the Label into a globally shared bitmap, which is equivalent to generating a BMFont.

    It is suitable for situations where the text changes frequently and is most friendly to performance and memory.

    Note: This mode can only be used for labels with a fixed font style and font size, and a large number of unused characters will not appear frequently. Because the maximum size of the shared bitmap is 2048*2048, there is no way to render new characters, and the shared bitmap needs to be switched to clear the shared bitmap.

    A label with the CHAR mode turned on cannot participate in the dynamic combination of pictures, but it can merge a DrawCall with the adjacent label of the same CHAR mode (equivalent to a BMFont that is not packaged into the atlas).

    This is the example of the interlacing of sprites and text mentioned above. In order to better reflect the advantages of the CHAR mode, I changed the structure of the scene node to separate the sprite and the text (for this you can see the UI level adjustment below).

    image

    All labels turn on the CHAR mode and change the text to a new random number every 0.2 seconds in the script.

    In this example, the engine will generate a BMFont containing the numbers 0 to 9 and store it in the memory at runtime. In addition, since I aggregate all the Labels together, the rendering of all the Labels is merged into one DrawCall. Please be special Pay attention to the frame time, frame rate and rendering time in the lower left corner.

    Looking at the above picture, it seems that you can’t see and change. Then we add a control group and set the Cache Mode option of all texts to the default NONE mode.

    At this point it can be found in the frame rate is almost 2 ms, average frame rate dropped by about 6 FPS, and rendering more than quadrupled, peaking at 1.8 ms.3

To sum up

The conclusion is obvious. For a large number of frequently changed texts, the performance improvement brought by the CHAR mode is very obvious.

At the same time, the limitation of the CHAR mode is also obvious. It is generally used for a large number of digital texts in the scene.

UI level adjustment

In addition to the above optimization solutions, we can also work hard in the game scene to optimize the performance to the extreme.

In fact, also mentioned above, we can optimize the node level, separate image nodes and text nodes, text or use BMFont Cache Mode option, and more.

image

Especially for a large number of text prompts (damage value, HP value, mana value, etc.) in battle scenes or a large number of experience value texts in synthetic games, because these texts are basically numbers, even if there is more text in this way Only one DrawCall needs to be rendered.

In the following scenario, the text is turned on in CHAR mode, and the script is used to generate about 50 random numbers per second. The text nodes are unified under the labelLayer node, so that all text can share 1 DrawCall, and the background and Cocos logo occupy one as well. The corner debug occupies one as well.

It can be seen that even if there are so tons of texts in the scene instantly, the overall performance is still quite impressive.

In this example, the engine generates a global shared bitmap (BMFont) containing the numbers 0 to 9 for us at runtime.

Of course, it would be better if BMFont can be used directly in Label.

Conclusion

  1. Changing the rendering state will interrupt the rendering batch, such as changing the texture state (pre-multiply, loop mode and filter mode) or changing the Material (Material), Blend (mixing mode), etc., so using a custom Shader will also interrupt the batch.

  2. By default, the atlas does not participate in dynamic combination. After manually turning on the Packable option of the automatic atlas resource, you can also participate in dynamic combination if the final atlas meets the requirements for dynamic combination.

  3. The custom shader cannot be used after the Packable option is enabled for the texture to participate in the dynamic combination, because the dynamic combination will modify the UV coordinates of the original texture.

  4. The BITMAP mode of Cache Mode needs to pay attention to the memory situation, and the CHAR mode needs to pay attention to whether the text content is too much and not repeated.

Last but not least

In the version before Cocos Creator 2.0.7, changing the color or transparency of the node, and using the slice of the Sprite component will interrupt the rendering batch.

2 posts - 2 participants

Read full topic

Game Facing Low FPS in iOS 14 Public Beta 7 using Cocos Creator Engine

$
0
0

I found out some slow rendering issue in mobile Safari when I use a demo project by Cocos Creator and run test on iPhone 8 with iOS 14 Public Beta 7.

1 post - 1 participant

Read full topic

Getting error while using Huawei Crash service in cocos creator.

$
0
0

I am newbie to Cocos creator and I am trying to implement Huawei crash service in a demo game.
While calling huawei.agc.crash.CrashService.enableCrashCollection(true), I am getting following error.
Apart from this I have already enabled crash from service panel. Please guide me where I am going wrong.

Simulator: E/jswrapper (274): ERROR: Uncaught ReferenceError: huawei is not defined, location: dst/assets/MainScript.js:0:0

STACK:

[0]onButtonClick@dst/assets/MainScript.js:38

[1]emit@src/cocos2d-jsb.js:28890

[2]emitEvents@src/cocos2d-jsb.js:28873

[3]_onTouchEnded@src/cocos2d-jsb.js:28466

[4]284.proto.emit@src/cocos2d-jsb.js:44772

[5]_doDispatchEvent@src/cocos2d-jsb.js:18271

[6]dispatchEvent@src/cocos2d-jsb.js:19164

[7]_touchEndHandler@src/cocos2d-jsb.js:18160

[8]_onTouchEventCallback@src/cocos2d-jsb.js:35636

[9]_dispatchEventToListeners@src/cocos2d-jsb.js:35722

[10]_dispatchTouchEvent@src/cocos2d-jsb.js:35671

[11]dispatchEvent@src/cocos2d-jsb.js:35923

[12]handleTouchesEnd@src/cocos2d-jsb.js:42767

[13]_mouseEventsOnElement@src/cocos2d-jsb.js:42914

[14]anonymous@src/cocos2d-jsb.js:42933

[15]dispatchEvent@jsb-adapter/jsb-builtin.js:3069

[16]anonymous@jsb-adapter/jsb-builtin.js:3141

E/jswrapper (574): [ERROR] (f:\jenkins\workspace\creator_2d\cocos2d-x-lite\windows\cocos2d-x-lite\cocos\scripting\js-bindings\jswrapper\v8\object.cpp, 574): Invoking function (1258D3F8) failed!

at HTMLElement.print-simulator-log (C:\CocosDashboard_1.0.9\resources.editors\Creator\2.4.2\resources\app.asar\editor\builtin\scene\panel\messages\scene.js:1:1606)

at Object.e._dispatch (C:\CocosDashboard_1.0.9\resources.editors\Creator\2.4.2\resources\app.asar\editor-framework\lib\renderer\panel.js:1:1876)

at EventEmitter. (C:\CocosDashboard_1.0.9\resources.editors\Creator\2.4.2\resources\app.asar\editor-framework\lib\renderer\ipc.js:1:2952)

at EventEmitter.emit (events.js:194:13)

at EventEmitter.emit (domain.js:469:20)

at EventEmitter.topLevelDomainCallback (domain.js:124:23)

2 posts - 2 participants

Read full topic

Async/Await support

$
0
0

Does Creator (v2.4.1) support it for native platforms?

Back in the day (v1.9.3) we had to use promise.js and async.js, because creator didn’t support natively. But I didn’t see anywhere saying that you can or can’t, so I’m makin this post to clarify

1 post - 1 participant

Read full topic

SDKBOX Ads Update Request (GMA 7.61.0 -> 7.64.0)

$
0
0

Hello,

Google has recommended that developers update their apps with GMA 7.64.0 for the pending iOS 14 update. After checking webrequests after importing the SDKBOX Ads I saw GMA 7.61.0 being used.

Can you confirm that the latest available (stable) SDKBOX Ads module uses GMA 7.61.0? And if possible, could you update this to 7.64.0 for the sake of the iOS 14 update?

1 post - 1 participant

Read full topic

Cocos creator - ios - how to autofill otp?

$
0
0

hi,
we are building a game in cocos creator where we need to verify the phone number of the player by entering the otp they receive on their phone number in an sms. now, we are not able to do this on the ios platform and i was wondering if someone knew a way.
here are some links:

ios otp autofill method

apple documentation

also, since after we send out a query for the otp, we will have to wait for some time before we will receive the otp from the sms, there needs to be a way for communication from objective-C to typescript. how can we achieve that.

thank you !!!

1 post - 1 participant

Read full topic

IOS 14 beta 7-8 webgl blending issue

$
0
0

I have been using Sprite Blend Factors to do some color effects and its been working as intended until i tried out my game in ios 14 beta. Im using DST_COLOR for the source then DST_ALPHA for the destination to create a sort of spotlight effect.

here is a video of it should look (running in safari ios 13)

and this how it looks in IOS 14, noticed that the blending is different already and when i change orientation/window size, the blending starts to flicker

I believe this an issue with the new IOS and might be fixed by them but i would like to check it here if there is any solutions for this. i have tested this with 2.2.2, 2.4.2 & 2.4.3-rc3.

1 post - 1 participant

Read full topic


"PluginFacebook/PluginFacebook.h" file not found ios sdkbox

$
0
0

I tried to build my game on ios and integrated facebook through sdkbox but getting this error while building , “‘PluginFacebook/PluginFacebook.h’ file not found”. Its coming in line "#include “PluginFacebook/PluginFacebook.h” in “PluginFacebookJSHelper.cpp” . Any idea what I am missing here. cocos creator version is 2.3.4. If anything else is required from my side then do let me know.

1 post - 1 participant

Read full topic

Cocos Creator 2.4.2 can not be installed / open on Mac

$
0
0

Hello, anyone can download Cocos Creator 2.4.2 on a Mac? I tried to download hundreds of times.
I always got a broken zip after 100% downloaded, thus, no way to install.

Tried to go to the temp folder, copy the zip file out and extract, still got a broken build.

Please at least give me a direct link or alternate link

Thanks a lot!

1 post - 1 participant

Read full topic

How to create a multidimensional array in JS

$
0
0

Hi forum,

I was wondering what is the best way to create a multidimensional array in javascript. I have read in the documentation that if you want to create an array you should use the following sintaxis:

Example of an array of integers:

arrayName: {
default: [],
type: [cc.Integer]
}

This is working but I am not quite sure about how to create a multidimensional one. Could you please help?

Thanks in advance and best regards,

1 post - 1 participant

Read full topic

[SDKBOX] Admob Google mobile ads update

$
0
0

(topic withdrawn by author, will be automatically deleted in 24 hours unless flagged)

1 post - 1 participant

Read full topic

Can png download and save on native platform happen only through hot update?

$
0
0

hi,
i want to download a png file into my installed app and save it there(not necessarily in the app installation folder…i don’t care where the file is saved as long it is on the device). now, i want to know if the following is the process for doing that:

  1. we need to use hot update.
  2. an older version of the file should already be present in the app.
  3. we need to unzip the earlier version of the apk and locate the png in the raw-assets folder(this step is too painstakingly long and time-consuming).
  4. we then need to upload a newer version of the png to our server.
  5. if the server entry of the png in the assets manifest is greater than the client entry then download the file.
  6. restart the app.

what is problematic here is that an older version of the file needs to be present already in the apk(a new file can’t be downloaded). also it is very time-consuming to locate the file in the raw-assets folder.

now, alternately, i can successfully download a png using cc.loader.load , but i am unable to save the file on the device using jsb.saveImageData.

can someone please tell me what the correct way to download and save a png is? and could you please provide a working example if possible?

Thank you!

1 post - 1 participant

Read full topic

How can i get ClassID from script's uuid

$
0
0

Hello every one,

I see in .fire file use type to define which script is binding, it seems similar to uuid of the script. My script’s meta was changed, and my scene cannot find the script look like this:

Class “0cc32i63/FOKqjHHCorOp6i” used by component “39cbfPrsIVCgJ2jcMPbDwi3” in scene “game.fire” is missing or invalid. Detailed information:

Node path: “GameUIController”
Asset url: “db://assets/Scene/game.fire”
Script UUID: “39cbf3eb-b085-4280-9da3-70c3db0f08b7”
Class ID: “39cbfPrsIVCgJ2jcMPbDwi3”

So how can I convert uuid to ClassID to replace in .fire file?

1 post - 1 participant

Read full topic

Collision Filtering and Contact Tests Not Behaving as Expected

$
0
0

I’m having difficulty trying to understand why I’m having different results from what I expected based on the explanations in API reference. It’s related to collision filtering, and contact test.

So I have two objects, one on the left, and another on the right, along with a contact (on begin) listener.

Wrote this code inside the init function of my scene, it’s just the code which reproduces my problem:

// Debug the physics objects. I didn't even use a DrawNode for simplicity.
this->getPhysicsWorld()->setDebugDrawMask(PhysicsWorld::DEBUGDRAW_ALL);

// Left object
{
    auto node = Node::create();
    node->setPosition(visibleSize.width / 2, visibleSize.height / 2);

    auto physicsBody = PhysicsBody::createCircle(30);
    physicsBody->setDynamic(true);
    physicsBody->setGravityEnable(false);
    physicsBody->setCategoryBitmask(1);
    physicsBody->setCollisionBitmask(2);
    physicsBody->setContactTestBitmask(2);
    node->addComponent(physicsBody);

    this->addChild(node);

    physicsBody->setVelocity(Vec2(50, 0));
}

// Right object
{
    auto node = Node::create();
    node->setPosition((visibleSize.width / 2) + 100, visibleSize.height / 2);

    auto physicsBody = PhysicsBody::createCircle(30);
    physicsBody->setDynamic(true);
    physicsBody->setGravityEnable(false);
    physicsBody->setCategoryBitmask(2);
    physicsBody->setCollisionBitmask(0);
    physicsBody->setContactTestBitmask(1);
    node->addComponent(physicsBody);

    this->addChild(node);
}

// Contact listener
auto contactListener = EventListenerPhysicsContact::create();
contactListener->onContactPostSolve = CC_CALLBACK_1(MainScene::onContactBegin, this);
_eventDispatcher->addEventListenerWithSceneGraphPriority(contactListener, this);

I’m facing two problems:

  • I want my contact listener’s callback function/method to be called whenever the objects collide. Applying logical AND operation with the Category Bitmask and Contact Test Bitmask returns a non-zero value with respect to both objects. So I can expect the callback function to the called, right? Sadly, it doesn’t work unless I set the Collision Bitmask of the right object to 1. According to the API reference - https://docs.cocos2d-x.org/api-ref/cplusplus/v4x/d7/d7b/classcocos2d_1_1_physics_body.html#a6850ee6e1b1aec30b38556ceed1fc4b3, it’s not supposed to be dependent on Collision Bitmask. I searched in numerous forum topics, documentation, etc, but couldn’t find any connection between Collision Bitmask and Contact Test Bitmask.

  • I want the left object to collide and be affected by the collision, but I don’t want the right object to be affected in any way. So I set the Collision Bitmask accordingly. According to the API reference - https://docs.cocos2d-x.org/api-ref/cplusplus/v4x/d7/d7b/classcocos2d_1_1_physics_body.html#a171f9b2c0bf7d8b4d3951c1f12402e00, only the left object shouldn’t affected. However, in reality, no objects are affected by collision. Nowhere in the documentation it is stated that the collision of one object depends on the Collision Bitmask of another objects. They are stated to be independent of one another.

Is there something I’m missing out? I did try to search the internet extensively and try out various things myself to understand out the behavior, but I failed to deduce any pattern. Thank you.

1 post - 1 participant

Read full topic


Tutorial: Cocos Creator: Adding a texture to your lines

$
0
0

Tutorial: Cocos Creator: Adding a texture to your lines

If you’ve ever played a game with a bridge, a rope, a snake, or another line with a texture, you may have wondered how you can do the same in your game. Our star writer, Baiyu Wubing, from the Chinese forums, shared this great tutorial on how to do the same for your game.

Let’s start with an example

How do we achieve this?

Start by creating the following:

  • a Scene
  • a cc.Graphics node
  • add a child node to the cc.Graphics node of type cc.Sprite, and change the rendering mode to Mesh.

Note: Mesh coordinates are calculated from the top left corner, and the Graphics drawing is drawn from the center.

The cc.Sprite node, the Scale is adjusted to (1,-1), and the Anchor is adjusted to (0,1).

In order to make sure the texture is filled after repeating beyond the boundary, the obtained texture size has to be a perfect square and set to Repeat.

Drawing a texture definitely needs coordinate position information.

Let’s take a look at the WEBGL implementation of Graphics.

Graphics has an _impl variable. _impl also has a _paths variable, the points of all objects recorded paths, and a corresponding image line. lineTo and moveTo will go to _paths stuffing data points to draw the line.

For the circle and arc and rect, other interfaces eventually calls lineTo and moveTo.

With _paths the texture is drawn, you can traverse the first point out.

    for( let index = 0; index < _impl._paths.length; index++) {
        const path = _impl._paths[index];
        const pathPoints = path.points;
        if (pathPoints.length < 2) continue;
        for(let index2 = 1; index2 < pathPoints.length; index2++) {
            // current point
               const p = cc.v2(pathPoints[index2].x, pathPoints[index2].y);
           // previous point
               const p_pre = cc.v2(pathPoints[index2 - 1].x, pathPoints[index2 - 1].y);
               }
     }

How to paint with a texture?

First, consider two adjacent points. Then consider the line width of w for rectangle painting. The rectangle has four points, and the coordinates of these four points are needed.

Second, calculate the direction of these two points.

const dir = p.sub(p_pre); // direction

Third, find a vector in the vertical direction (calculated based on the inner vector product being 0) of the length is half the line width.

const cross_dir = (dir.y == 0 ? cc.v2(0, 1) : cc.v2(1, -dir.x / dir.y).normalize()).mulSelf(w / 2); // Vertical direction

The four vertices of this rectangle can be obtained from the two points and the vertical direction.

const p_r_t = p.add(cross_dir); // upper right
const p_r_b = p.sub(cross_dir); // upper left
const p_l_t = p_pre.add(cross_dir); // bottom right
const p_l_b = p_pre.sub(cross_dir); // bottom left

The last four points padding sprite.spriteFrame data vertices, if you need further understanding, please reference the Preliminary grid sprite rendering mode article (Chinese only).

For uv texture coordinates, vertex coordinates used here directly a scaling factor. Example implementation:

    const uv_mul = 50;
    const i_offset = vertices.x.length;
    vertices.x.push(p_r_t.x, p_r_b.x, p_l_t.x, p_l_b.x);
    vertices.y.push(p_r_t.y, p_r_b.y, p_l_t.y, p_l_b.y);
    vertices.nu.push(p_r_t.x / uv_mul, p_r_b.x / uv_mul, p_l_t.x / uv_mul, p_l_b.x / uv_mul);
    vertices.nv.push(p_r_t.y / uv_mul, p_r_b.y / uv_mul, p_l_t.y / uv_mul, p_l_b.y / uv_mul);
    vertices.triangles.push(i_offset + 0);
    vertices.triangles.push(i_offset + 1);
    vertices.triangles.push(i_offset + 2);
    vertices.triangles.push(i_offset + 1);
    vertices.triangles.push(i_offset + 2);
    vertices.triangles.push(i_offset + 3);

This code works, but there is a problem with drawing rectangles in this way. For drawing arcs, if the separation is too large, or the line width is relatively large, separation will occur.

78bac3cce2fbe0213771ce1dc1b75f6363f71728

How to deal with this gap?

Just draw a circle at the connection point so that the gap can be removed.

02-02

How to draw a circle?

A circle can be regarded as a regular polygon, and the position coordinates can be confirmed according to the relationship between the radius and the center of the circle. Please refer to the special loading effects of shader animation article to learn more (Chinese only).

13-11

The radius is exactly half the width of the line. The coordinates on a circle are converted into the following code.

    //angle
    const r = 2 * Math.PI * index3 / count;
    // Calculate the direction vector first, and add the coordinates of the center of the circle to the point on the circle.
    const pos_circle = cc.v2(w / 2 * Math.cos(r), w / 2 * Math.sin(r)).addSelf(p);

How to determine the vertex index?

Follow the center of the circle and draw triangles one by one.

This is one of the indexing methods, converted into the code as follows. Example implementation:

    // Drawing a circle
    const count = 12;
    i_offset = vertices.x.length;
    vertices.x.push(p.x);
    vertices.y.push(p.y);
    vertices.nu.push(p.x / uv_mul);
    vertices.nv.push(p.y / uv_mul);
    for (let index3 = 0; index3 < count; index3++) {
          const r = 2 * Math.PI * index3 / count;
          const pos_circle = cc.v2(w / 2 * Math.cos(r), w / 2 * Math.sin(r)).addSelf(p);
          vertices.x.push(pos_circle.x);
          vertices.y.push(pos_circle.y);
          vertices.nu.push(pos_circle.x / uv_mul);
          vertices.nv.push(pos_circle.y / uv_mul);
          if (index3 === 0) {
                   // 0 - count -1
                   vertices.triangles.push(i_offset, i_offset + 1 + index3, i_offset + count);
                    } else {
                   // 0 - index3 - (index3-1)*
                   vertices.triangles.push(i_offset, i_offset + 1 + index3, i_offset + index3);
            }
    }

The above code is just to achieve the effect of a simple drawing texture. To achieve the effect of a rope, recalculate the texture coordinates, which are related to the position/direction/length.

02-04

Line drawing texture rope

Several front lines drawing texture has been achieved; the main goal is to calculate the correct uv coordinates.

Because this line has a direction and a length, it will affect the calculation of texture coordinates.

Note: one idea: pulling all the line segments into a straight line and place them in one direction.

In-order to make this texture move from the head from the tail, after straightening, the last point is used as the starting point of the texture.

When traversing this point, start from the end and record the length of each section.

09-06

Texture coordinates v two points are 0 and 1. The texture coordinates u (horizontal direction) are calculated based on the length of the rope. Example:

    // Calculate from the last point
    for (let index2 = pathPoints.length - 1; index2 > 0; index2--) {
          // Omit part of the code
          vertices.x.push( **p_r_t** .x, p_r_b.x, **p_l_t** .x, p_l_b.x);
          vertices.y.push( **p_r_t** .y, p_r_b.y, **p_l_t** .y, p_l_b.y);
          // Calculate uv
          vertices.nu.push(offsetX.x * uv_mul, offsetX.x * uv_mul, (offsetX.x + dirLen) * uv_mul, (offsetX.x + dirLen) * uv_mul);
          vertices.nv.push(1, 0, 1, 0);
          // Omit part of the code
          offsetX.addSelf(cc.v2(dirLen, 0)); *//* *Record the length of the drawing*
    }

One problem with this backward traversal is that the head will cover the texture of the tail.

09-07

After calculating the vertex index of the rectangle, it needs to be reversed as a whole and drawn from the beginning. Example implementation:

    let trianglesCache: number[ ][ ] = [ ];
    for ( let index2 = pathPoints.length - 1; index2 > 0; index2--) {
          // Omit part of the code
          triangles.push(i_offset + 0);
          triangles.push(i_offset + 1);
          triangles.push(i_offset + 2);
          triangles.push(i_offset + 1);
          triangles.push(i_offset + 2);
          triangles.push(i_offset + 3);
          trianglesCache.push(triangles);
    }
    trianglesCache.reverse(); //Vertex index inversion
    trianglesCache.forEach(v => {
          //True vertex index order
          vertices.triangles.push(...v)
    }

After inversion, the texture of the rope is correct.

09-08

For drawing a circle (actually a polygon) at the connection, pay attention to the rotation of each point so that the texture direction of the circle is correct.

09-09

Example implementation:

    // Draw a circle
    const dir_angle = dir.signAngle(cc.v2(-1, 0)); //The included angle with the negative direction of the x-axis
    const count = 12;
    i_offset = vertices.x.length;
    // Here is the center of the circle
    vertices.x.push(p.x);
    vertices.y.push(p.y);
    vertices.nu.push(offsetX.x * uv_mul);
    vertices.nv.push(0.5);
    for (let index3 = 0; index3 < count; index3++) {
           const** r = 2 * Math.PI * index3 / count;
           //Vector from center to each side
           const pos_circle = cc.v2(w / 2 * Math.cos(r), w / 2 * Math.sin(r));
           vertices.x.push(pos_circle.add(p).x);
           vertices.y.push(pos_circle.add(p).y);
           // Need to rotate for round uv
           vertices.nu.push((pos_circle.rotate(dir_angle).x + offsetX.x) * uv_mul);
           vertices.nv.push(pos_circle.rotate(dir_angle).y / w + 0.5);
           if (index3 === 0) {
                  triangles.push(i_offset, i_offset + 1 + index3, i_offset + count);
                  } else {
                         triangles.push(i_offset, i_offset + 1 + index3, i_offset + index3);
                  }
    }

What should we have achieved?

Finally, here is an example of drawing a star:

09-10

Summary

The whole idea of ​​the rope texture is to convert all the curved lines into straight, and then calculate the texture coordinates.

1 post - 1 participant

Read full topic

Cocos2dx prebuilt library for android

$
0
0

I have a cocos2dx Android project but every time I clean build, the cocos2dx engine gets compiled again which I want to avoid and want to create a prebuilt library for cocos2dx. It would be helpful if any one can point me to the right direction in this regard.

1 post - 1 participant

Read full topic

error: undefined reference to 'sdkbox::PluginFacebook::init();'

$
0
0

I use Cocos v4, and CMake to install the SDK box plugins, but i got error when i call function sdkbox::PluginFacebook::init();.
i hope anyone can help solve this problem. Thank you :innocent:

1 post - 1 participant

Read full topic

Detect user closing application window

$
0
0

The windows and Mac versions of my app have the traditional window controls in the corner (minimize, maximize, and close). I’d like to catch the event if they hit the window close icon so that I can ask for a confirmation. Is this possible?

thanks!

2 posts - 2 participants

Read full topic

error: undefined reference to 'CppSQLite3DB::~CppSQLite3DB()'

Viewing all 17056 articles
Browse latest View live